SoD Phase 2: Retribution Paladin PVE Guide
Last updated on February 24, 2024 by MMOJUGG Team | Game: WOW Classic Season Of Discovery Guide |

The Class changes slated for release on February 28th still require further assessment. Undoubtedly, these changes have narrowed the DPS gap between
Seal of Command
andSeal of Martyrdom
, as well as the DPS disparity ofSeal of Martyrdom
in deep Holy and deep Retribution talent trees (previously, the high frequency of The Art of War triggers causing Holy Shock refreshes resulted in "continuing" to use the newly refreshed Exorcism before it could be utilized).With the advent Season of Discovery Phase 2, Retribution Paladins runes are becoming more robust, gradually presenting some areas worth "Discovering." It is precisely under the influence of "Discover" that any trailblazer will temporarily gain a comparative advantage in output. Today, alongside MMOJUGG, let's delve into some aspects of Phase 2 Retribution Paladin PVE.
Overview
In Phase 2, Retribution Paladins departed from Seal of Command's dominance in Phase 1, increasingly dividing into two distinct output approaches: Seal of Martyrdom
and Seal of Command
, each with its own merits. The greatest difference between the Seal of Martyrdom and Seal of Command factions lies in their output skills, especially the distinctions in Seal Characteristics, leading to differences in weapon selection. The Seal of Command DPS output approach requires no further explanation, as it was quite mature in Phase 1. However, by Phase 2, Blizzard's several adjustments have brought the Seal of Martyrdom to the forefront:- Adjusting the damage percentage of Seal of Martyrdom to 40%;
- Changing the attack power bonus of Seal of Martyrdom from non-standard weapon speed to standard weapon speed, allowing fast weapons paired with Seal of Martyrdom to gain additional DPS;- Wild Strikes can be triggered by certain skills and Seals, with the 100% normal attack trigger rate of Seal of Martyrdom significantly higher than the low trigger rate and brief internal CD of Seal of Command (Seal of Command cannot be triggered continuously, and even if Wild Strikes is triggered, it can only trigger Seal of Command once);- The Retribution Paladin's exclusive legendary weapon, Automatic Crowd Pummeler, with a 2.0 super-fast attack speed and incredibly powerful usage effect, sets the standard for all.
Skill Characteristics
Seal of Martyrdom
Trigger Mechanism:
A. A single hit of normal attack can trigger one strike of Seal of Martyrdom with a 100% chance.B. Damage type is holy damage, ignoring armor, affected by Sanctity Aura, and may be partially resisted.C. Damage is determined as physical, affected by melee physical critical strikes, hit chance, with a base critical damage of 200%, influenced by Two-Handed Weapon Specialization talent, and may be dodged or parried.
Damage Bonus:
A. Attack power bonus is calculated based on standard weapon speed (3.3 for two-handed weapons & 2.4 for one-handed weapons), meaning the faster the base weapon speed, the higher the DPS of Seal of Martyrdom.B. Currently not affected by any spell power bonuses.
Trigger Conditions:
Can trigger Wild Strikes. Can trigger The Art of War upon critical hits. Can trigger various hit effects.
Judgement of Martyrdom:
A. Judgment mechanism is similar to Seal of Martyrdom, but instances of misses, dodges, or parries have not been observed.B. Damage bonus is calculated based on non-standard weapon speed (i.e., based on weapon base attack speed), slightly weakening the damage of fast weapons with Judgement of Martyrdom, but not enough to reverse their advantages.C. Can trigger Wild Strikes, The Art of War upon critical hits, and various hit effects.
Seal of Command
Trigger Mechanism:
A. A single hit of normal attack can trigger one strike of Seal of Command with a probability per minute (PPM) of 7, meaning the slower the base weapon speed, the higher the probability of triggering Seal of Command per hit.B. Other Trigger mechanisms are consistent with Seal of Martyrdom.
Damage Bonus:
A. Attack power bonus is calculated based on non-standard weapon speed, combined with the PPM mechanism, meaning the slower the base weapon speed, the higher the DPS of Seal of Command.B. According to previous data, Seal of Command itself is affected by a 20% spell power & 29% holy spell power bonus, slightly weakening the advantage of slow weapons with Seal of Command, but not enough to reverse it.
Trigger Conditions:
Can trigger Wild Strikes. Can trigger The Art of War upon critical hits. Can trigger various hit effects. Has a brief internal cooldown, meaning when Wild Strikes is triggered, Retribution Paladins can only deal Seal of Command damage once at most.
Judgement of Command:
A. Trigeer mechanism is consistent with Judgement of Martyrdom.B. Damage bonus is not directly affected by attack power, only by spell power bonuses, with the bonus ratio calculated based on instant cast spells (i.e., 1.5/3.5).C. Can trigger Wild Strikes, The Art of War upon critical hits, and various hit effects.
Seal of Righteousness
Trigger Mechanism:
A. A single hit of normal attack can trigger one instance of Seal of Righteousness damage with a 100% chance.B. Damage type is holy damage, ignoring armor, affected by the aura Sanctity Aura, and may be partially resisted.C. The damage judgment is unique, with a 100% hit chance, cannot critically strike, and is not affected by Two-Handed Weapon Specialization talent.
Damage Bonus:
A. Not directly affected by attack power.B. Affected by a 20% bonus for one-handed weapons and a 24% bonus for two-handed weapons based on spell power.
Trigger Conditions:
A. Current data does not support triggering Wild Strikes.B. No critical hits, therefore cannot trigger The Art of War.C. Can trigger various hit effects.
Judgement of Justice:
A. Judgment mechanism can roughly be considered as a spell attack.B. Damage bonus is not directly affected by attack power, only by spell power bonuses, with a bonus ratio based on previous data being 50%.C. Current data does not support triggering Wild Strikes. Cannot trigger The Art of War upon critical hits. Current data does not support triggering various hit effects.
Seal Dance:
Seal Dance for Retribution Paladins refers to "Seal CD clipping," where the BUFF effect of all Seals, particularly Seal of Command, delays its disappearance by 0.4 seconds when switching to any other Seal. This allows for maintaining the normal attack effect of two Seals during the switch.
A. Blizzard partially retains the Seal Dance mechanism in SoD, where switching Seals temporarily delays for 0.4 seconds. If you hit the target with a normal attack during this time, the attack will trigger the effects of two different Seals.
B. Blizzard only retains bi-directional switching between Seal of Martyrdom and Seal of Righteousness & Seal of Command and Seal of Righteousness for damage-oriented Seals.C. Seal Dance can be an effective supplement to any output strategy for Retribution Paladins. However, it's worth noting that if Blizzard does not continue to adjust the related content of Seal Dance in the future, the space for its use will gradually diminish as The Art of War trigger rate increases. However, this is not applicable in Phase 2.
Other SkillsCrusader Strike:
A. A single purely physical attack with attack power bonus calculated based on standard weapon speed.B. Cannot trigger any Seal damage.C. Can trigger Wild Strikes, The Art of War upon critical hits, and various hit effects.Divine Storm:
A. A single purely physical attack with attack power bonus calculated based on non-standard weapon speed.B. Cannot trigger any Seal damage.C. Can trigger Wild Strikes, The Art of War upon critical hits, and various hit effects.Exorcism:
A single purely spell attack with spell power bonus calculated based on instant cast spells.Phase 2 Retribution Paladins do not utilize Holy Shock or Consecration due to a lack of talent points to support them. Holy Shock has not been found to be a feasible output skill for Retribution Paladins until Blizzard makes significant modifications.
DPS Output Strategy
Seal of Martyrdom
Basic Priority:
Exorcism > Crusader Strike > Judgement of MartyrdomPriority with Seal Dance:
Ensure Seal of Martyrdom coverage during normal attacks through Seal Dance or Judgement of Justice > Exorcism > Crusader Strike > Judgement > Seal Dancing to Seal of Righteousness
Seal of CommandBasic Priority:
Exorcism > Judgement of Command > Crusader Strike > Holy ShockPriority with Seal Dance:
Exorcism > Ensure Seal of Command coverage during normal attacks through Seal Dance > Judgement of Command > Crusader Strike > Holy Shock > Seal Dancing to Seal of RighteousnessSustainability Issues
- With Judgement of Wisdom, Retribution Paladins have almost no sustainability issues when using Seal of Martyrdom for output, as mana overflow is evident.- When Judgement of Wisdom is unavailable, prepare Major Mana Potions. With a willingness to use them, sustainability pressure is minimal.- Considering the Paladin's own DPS, if there is only one Retribution Paladin in the raid group, prioritize maintaining Crusader Strike.
Phase 2 Retribution Paladin Runes & Talents
Phase 2 Retribution Paladin Runes - Virtually No Room for ChoiceChest:
Seal of Martyrdom Rune Or Holy Shock Rune
Waist:
Sheath of Light RuneLegs:
Exorcist RuneFeet:
The Art of War RuneHands:
Crusader Strike Rune
Phase 2 Retribution Paladin Talents - Almost Fixed1/0/30Holy Talent Tree: 1 PointFirst Layer: Divine Strength (1/5)
Retribution Talent Tree: 30 PointsFirst Layer: Improved Blessing of Might (5/5) & Benediction (3/5);Second Layer: Improved Judgement (2/2) & Improved Seal of the Crusader (3/3) & Deflection (0/5);Third Layer: Vindication (0/3) & Conviction (5/5) & Seal of Command (1/1) & Pursuit of Justice (2/2)Fourth Layer: Eye of an Eye (0/2) & Improved Retribution Aura (0/2)Fifth Layer: Two-handed Weapon Specialization (3/3) & Sanctity Aura (1/1)Sixth Layer: Vengeance (5/5)
The 3 points in Benediction can be reallocated to other talents you find potentially useful.
Phase 2 Retribution Paladin Weapon SelectionSeal of Martyrdom
Best: Automatic Crowd Pummeler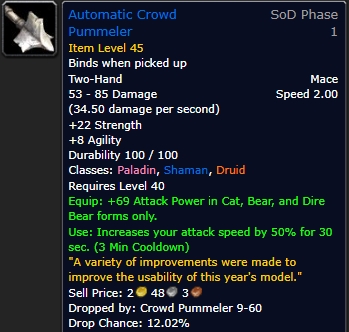
Obtainment Method: Drop from "Crowd Pummeler 9-60" in GnomereganDescription: In the hands of a Retribution Paladin, the Automatic Crowd Pummeler outperforms even the Feral Druid. While it may only be exceptionally effective for Feral Druids, for Retribution Paladins, it is unparalleled in its overall strength. This is truly a legendary weapon.
Second Best: The Jackhammer
Obtainment Method: Drop from mobs in Uldaman & purchase from the auction houseDescription: With a base trigger rate of approximately 5%, The Jackhammer can be triggered by Retribution Paladins in various ways, resulting in an average coverage rate of about 35%. It's an epic weapon without a global cooldown like Dragonspine Trophy, but it falls short of the Automatic Crowd Pummeler.
For Phase 2 Retribution Paladins, the base DPS gain from weapons is relatively low. Before using any weapon, ensure that the weapon skill for that category is at 203 or higher.
Phase 2 Retribution Paladin Pre BiS
Neck: Strength or Tiger Enchantments Green Necklace (World loot) & High Tide Choker (Drop from "Baron Aquanis" in Blackfathom Deeps)Shoulders: Failed Flying Experiment (Obtained from Feralas quest "Rescue OOX-22/FE")Back: Strength or Tiger Enchantments Green Cloak (World loot) & Blooddrenched Drape (Acquired from "The Blood moon" event in Stranglethorn Vale)Chest: Warforged Chestplate (Reward from Badlands quest "Tremors of the Earth") & Shifting Silver Breastplate (Requires Blacksmithing 175)Wrists: Berserker Bracers (Purchased from Silverwing Supply Officer) & Ironaya's Bracers (Drop from "Ironaya" in Uldaman) & Strength or Tiger Enchantments Green Bracers (World loot)Hands: Gloves of Holy Might (World loot) & Plated Fist of Hakoo (World loot) & Cragfists (Drop from "Ancient Stone Keeper" in Uldaman) & Pratt's Handcrafted Gloves (Reward from Feralas quest "The Mark of Quality") & Gauntlets of Divinity (Drop from "Scarlet Commander Mograine" in Cathedral of Scarlet Monastery)Waist: Boar Champion's Belt (Drop from "Ragglesnout" in Razorfen Downs) & Highlander's Plate Girdle (Purchased from League of Arathor Supply Officer)Legs: Centurion Legplates (Reward from Searing Gorge quest "Rise, Obsidion!") & Scarlet Leggings (Drop from "Herod" in Armory of Scarlet Monastery & Drop from "Scarlet Commander Mograine" in Cathedral of Scarlet Monastery)Feet: Shinkicker Boots (Reward from Booty Bay quest "Deliver to MacKinley")Ring A: lvl 38 Protector's Band (Purchased from Silverwing Supply Officer)Ring B: Thunderbrow Ring (World loot) & lvl 28 Protector's Band (Purchased from Silverwing Supply Officer) & Strength or Tiger Enchantments Green Ring (World loot)Trinket A: Avenger's Void Pearl (Quest reward from Blackfathom Deeps "Aku'mai")Trinket B: Limited options available, but any trinket is better than none.
Phase 2 Retribution Paladin BiS
Head: Tempered Interference-Negating Helmet (Requires Blacksmithing 225) & Raging Berserker's Helm (Drop from "Herod" in Armory of Scarlet Monastery)Shoulders: Troggslayer Pauldrons (Drop from "Grubbis" in Gnomeregan)Back: Hazecover Cloak (Drop from "Viscous Fallout" in Gnomeregan)Chest, Legs, Feet: Insulated Chestguard & Insulated Legguards & Insulated Workboots or H.A.Z.A.R.D. Breastplate & H.A.Z.A.R.D. Legplates & H.A.Z.A.R.D. Boots (Acquired from Gnomeregan bosses by exchanging Power Depleted Chest, Legs, and Boots)Wrists: Berserker Bracers (Purchased from Silverwing Supply Officer) & Experimental Aim Stabilizers (Drop from "Crowd Pummeler 9-60" in Gnomeregan)Hands: Grubby Gauntlets (Drop from "Grubbis" in Gnomeregan) for non-mechanical mobs & Machinist's Gloves (Drop from "Electrocutioner 6000" in Gnomeregan) for mechanical mobsWaist: Hyperconductive Goldwrap (Requires Engineering 225) & Power-Assisted Lifting Belt (Drop from "The Mechanical Menagerie" in Gnomeregan) & Darkvision Girdle (Drop from "The Mechanical Menagerie" in Gnomeregan)Ring A: lvl 38 Protector's Band (Purchased from Silverwing Supply Officer)Trinket A: Avenger's Void Pearl (Quest reward from Blackfathom Deeps "Aku'mai")Trinket B: Gyromatic Experiment 420b (Drop from "Mekgineer Thermaplugg" in Gnomeregan) - Note: Use the effect sparingly.Other trinkets: Domesticated Attack Chicken (Drop from "Mekgineer Thermaplugg" in Gnomeregan) - Provides a stable 5% attack speed buff for the Group.
Team Buffs Directly Associated with Paladin DPS Output
Paladin: Improved Blessing of Might. Sanctity Aura. Crusader's Judgment. Judgement of Wisdom. Blessing of Salvation.Feral Druid: Wild Strikes. Wild Mark. Leader of the Pack. Faerie FireBerserk Warrior: Improved Battle ShoutHunter: Heart of the LionPriest: HomunculiWarlock: Curse of Recklessness. Demonic Pact (Hard to get)Mage: Arcane WisdomBalance Druid: 3% spell damage (impossible to get)
Phase 2 Retribution Paladin: Professions, Enchantments, and Consumables
Professions for Retribution PaladinBlacksmithing & Engineering & Enchanting - 3 choose 2- Note: If not learning Blacksmithing, Raging Berserker's Helm is the only suitable option, as Gnomeregan does not have any other helmets suitable for Retribution Paladins.- Note: If using Seal Dance, there are limited opportunities to use engineering bombs.- Note: The Sigil of Innovation enchantment can provide Retribution Paladins with 20 attack power and 20 spell power, but this effect only lasts for 30 minutes and has a cooldown of 30 minutes, meaning you cannot pre-buff.
Enchantments for Retribution Paladin
Weapon: Iron Counterweight (provides 3% attack speed, crafted by Blacksmithing, available in the auction house) Dismantle (may deal 60-90 damage to mechanical targets when hit)Note: If you are an enchanter, you can try using Iron Counterweight for the first 2 bosses and Dismantle for the last 4 bosses. If you are not an enchanter, you can use Iron Counterweight for all bosses because the benefits of Dismantle are questionable.Back: Lesser Agility (+3 agility)Chest: Lesser Stats (+2 to all stats)Wrist: Strength (+5 strength)Hands: Strength (+5 strength)Feet: Lesser Agility (+3 agility)
Consumables for Retribution Paladin:
Dragonbreath Chili: Vital for Retribution Paladins, the effects are best experienced.Scroll of Strength II: Grants +9 strength. Note: Currently, only II is available, not III.Elixir of Agility: Grants +15 agility.Lesser Arcane Elixir: Grants +14 spell power.Bogling Root: Grants +1 weapon damage.Elixir of Firepower: Grants +10 fire spell power. Note: Can enhance the damage of Dragonbreath Chili.Elixir of Fortitude & Elixir of Greater Defense: Potions for survival.Superior Healing Potion & Greater Mana Potion: For emergency use.Oil of Immolation: Provides stable AoE damage, with no cooldown, but resets normal attacks when used.
The above information covers the research part of Phase 2 Retribution Paladin PvE. I hope it helps players. MMOJUGG currently offers Season of Discovery gold purchases. Welcome to place your orders. For US server players, click on "wow sod gold" to order, and for EU server players, click on "wow sod gold eu" to order. Discount code: mmojugg.
In Phase 2, Retribution Paladins departed from Seal of Command's dominance in Phase 1, increasingly dividing into two distinct output approaches:
Seal of Martyrdom
andSeal of Command
, each with its own merits. The greatest difference between the Seal of Martyrdom and Seal of Command factions lies in their output skills, especially the distinctions in Seal Characteristics, leading to differences in weapon selection. The Seal of Command DPS output approach requires no further explanation, as it was quite mature in Phase 1. However, by Phase 2, Blizzard's several adjustments have brought the Seal of Martyrdom to the forefront:- Adjusting the damage percentage of Seal of Martyrdom to 40%;
- Changing the attack power bonus of Seal of Martyrdom from non-standard weapon speed to standard weapon speed, allowing fast weapons paired with Seal of Martyrdom to gain additional DPS;
- Wild Strikes can be triggered by certain skills and Seals, with the 100% normal attack trigger rate of Seal of Martyrdom significantly higher than the low trigger rate and brief internal CD of Seal of Command (Seal of Command cannot be triggered continuously, and even if Wild Strikes is triggered, it can only trigger Seal of Command once);
- The Retribution Paladin's exclusive legendary weapon, Automatic Crowd Pummeler, with a 2.0 super-fast attack speed and incredibly powerful usage effect, sets the standard for all.
Skill Characteristics
Seal of Martyrdom
Trigger Mechanism:
A. A single hit of normal attack can trigger one strike of Seal of Martyrdom with a 100% chance.B. Damage type is holy damage, ignoring armor, affected by Sanctity Aura, and may be partially resisted.C. Damage is determined as physical, affected by melee physical critical strikes, hit chance, with a base critical damage of 200%, influenced by Two-Handed Weapon Specialization talent, and may be dodged or parried.
Damage Bonus:
A. Attack power bonus is calculated based on standard weapon speed (3.3 for two-handed weapons & 2.4 for one-handed weapons), meaning the faster the base weapon speed, the higher the DPS of Seal of Martyrdom.B. Currently not affected by any spell power bonuses.
Trigger Conditions:
Can trigger Wild Strikes. Can trigger The Art of War upon critical hits. Can trigger various hit effects.
Judgement of Martyrdom:
A. Judgment mechanism is similar to Seal of Martyrdom, but instances of misses, dodges, or parries have not been observed.B. Damage bonus is calculated based on non-standard weapon speed (i.e., based on weapon base attack speed), slightly weakening the damage of fast weapons with Judgement of Martyrdom, but not enough to reverse their advantages.C. Can trigger Wild Strikes, The Art of War upon critical hits, and various hit effects.
Seal of Command
Trigger Mechanism:
A. A single hit of normal attack can trigger one strike of Seal of Command with a probability per minute (PPM) of 7, meaning the slower the base weapon speed, the higher the probability of triggering Seal of Command per hit.B. Other Trigger mechanisms are consistent with Seal of Martyrdom.
Damage Bonus:
A. Attack power bonus is calculated based on non-standard weapon speed, combined with the PPM mechanism, meaning the slower the base weapon speed, the higher the DPS of Seal of Command.B. According to previous data, Seal of Command itself is affected by a 20% spell power & 29% holy spell power bonus, slightly weakening the advantage of slow weapons with Seal of Command, but not enough to reverse it.
Trigger Conditions:
Can trigger Wild Strikes. Can trigger The Art of War upon critical hits. Can trigger various hit effects. Has a brief internal cooldown, meaning when Wild Strikes is triggered, Retribution Paladins can only deal Seal of Command damage once at most.
Judgement of Command:
A. Trigeer mechanism is consistent with Judgement of Martyrdom.B. Damage bonus is not directly affected by attack power, only by spell power bonuses, with the bonus ratio calculated based on instant cast spells (i.e., 1.5/3.5).C. Can trigger Wild Strikes, The Art of War upon critical hits, and various hit effects.
Seal of Righteousness
Trigger Mechanism:
A. A single hit of normal attack can trigger one instance of Seal of Righteousness damage with a 100% chance.B. Damage type is holy damage, ignoring armor, affected by the aura Sanctity Aura, and may be partially resisted.C. The damage judgment is unique, with a 100% hit chance, cannot critically strike, and is not affected by Two-Handed Weapon Specialization talent.
Damage Bonus:
A. Not directly affected by attack power.B. Affected by a 20% bonus for one-handed weapons and a 24% bonus for two-handed weapons based on spell power.
Trigger Conditions:
A. Current data does not support triggering Wild Strikes.B. No critical hits, therefore cannot trigger The Art of War.C. Can trigger various hit effects.
Judgement of Justice:
A. Judgment mechanism can roughly be considered as a spell attack.B. Damage bonus is not directly affected by attack power, only by spell power bonuses, with a bonus ratio based on previous data being 50%.C. Current data does not support triggering Wild Strikes. Cannot trigger The Art of War upon critical hits. Current data does not support triggering various hit effects.
Seal Dance:
Seal Dance for Retribution Paladins refers to "Seal CD clipping," where the BUFF effect of all Seals, particularly Seal of Command, delays its disappearance by 0.4 seconds when switching to any other Seal. This allows for maintaining the normal attack effect of two Seals during the switch.
A. Blizzard partially retains the Seal Dance mechanism in SoD, where switching Seals temporarily delays for 0.4 seconds. If you hit the target with a normal attack during this time, the attack will trigger the effects of two different Seals.
B. Blizzard only retains bi-directional switching between Seal of Martyrdom and Seal of Righteousness & Seal of Command and Seal of Righteousness for damage-oriented Seals.C. Seal Dance can be an effective supplement to any output strategy for Retribution Paladins. However, it's worth noting that if Blizzard does not continue to adjust the related content of Seal Dance in the future, the space for its use will gradually diminish as The Art of War trigger rate increases. However, this is not applicable in Phase 2.
Other SkillsCrusader Strike:
A. A single purely physical attack with attack power bonus calculated based on standard weapon speed.B. Cannot trigger any Seal damage.C. Can trigger Wild Strikes, The Art of War upon critical hits, and various hit effects.Divine Storm:
A. A single purely physical attack with attack power bonus calculated based on non-standard weapon speed.B. Cannot trigger any Seal damage.C. Can trigger Wild Strikes, The Art of War upon critical hits, and various hit effects.Exorcism:
A single purely spell attack with spell power bonus calculated based on instant cast spells.Phase 2 Retribution Paladins do not utilize Holy Shock or Consecration due to a lack of talent points to support them. Holy Shock has not been found to be a feasible output skill for Retribution Paladins until Blizzard makes significant modifications.
DPS Output Strategy
Seal of Martyrdom
Basic Priority:
Exorcism > Crusader Strike > Judgement of MartyrdomPriority with Seal Dance:
Ensure Seal of Martyrdom coverage during normal attacks through Seal Dance or Judgement of Justice > Exorcism > Crusader Strike > Judgement > Seal Dancing to Seal of Righteousness
Seal of CommandBasic Priority:
Exorcism > Judgement of Command > Crusader Strike > Holy ShockPriority with Seal Dance:
Exorcism > Ensure Seal of Command coverage during normal attacks through Seal Dance > Judgement of Command > Crusader Strike > Holy Shock > Seal Dancing to Seal of RighteousnessSustainability Issues
- With Judgement of Wisdom, Retribution Paladins have almost no sustainability issues when using Seal of Martyrdom for output, as mana overflow is evident.- When Judgement of Wisdom is unavailable, prepare Major Mana Potions. With a willingness to use them, sustainability pressure is minimal.- Considering the Paladin's own DPS, if there is only one Retribution Paladin in the raid group, prioritize maintaining Crusader Strike.
Phase 2 Retribution Paladin Runes & Talents
Phase 2 Retribution Paladin Runes - Virtually No Room for ChoiceChest:
Seal of Martyrdom Rune Or Holy Shock Rune
Waist:
Sheath of Light RuneLegs:
Exorcist RuneFeet:
The Art of War RuneHands:
Crusader Strike Rune
Phase 2 Retribution Paladin Talents - Almost Fixed1/0/30Holy Talent Tree: 1 PointFirst Layer: Divine Strength (1/5)
Retribution Talent Tree: 30 PointsFirst Layer: Improved Blessing of Might (5/5) & Benediction (3/5);Second Layer: Improved Judgement (2/2) & Improved Seal of the Crusader (3/3) & Deflection (0/5);Third Layer: Vindication (0/3) & Conviction (5/5) & Seal of Command (1/1) & Pursuit of Justice (2/2)Fourth Layer: Eye of an Eye (0/2) & Improved Retribution Aura (0/2)Fifth Layer: Two-handed Weapon Specialization (3/3) & Sanctity Aura (1/1)Sixth Layer: Vengeance (5/5)
The 3 points in Benediction can be reallocated to other talents you find potentially useful.
Phase 2 Retribution Paladin Weapon SelectionSeal of Martyrdom
Best: Automatic Crowd Pummeler
Obtainment Method: Drop from "Crowd Pummeler 9-60" in GnomereganDescription: In the hands of a Retribution Paladin, the Automatic Crowd Pummeler outperforms even the Feral Druid. While it may only be exceptionally effective for Feral Druids, for Retribution Paladins, it is unparalleled in its overall strength. This is truly a legendary weapon.
Second Best: The Jackhammer
Obtainment Method: Drop from mobs in Uldaman & purchase from the auction houseDescription: With a base trigger rate of approximately 5%, The Jackhammer can be triggered by Retribution Paladins in various ways, resulting in an average coverage rate of about 35%. It's an epic weapon without a global cooldown like Dragonspine Trophy, but it falls short of the Automatic Crowd Pummeler.
For Phase 2 Retribution Paladins, the base DPS gain from weapons is relatively low. Before using any weapon, ensure that the weapon skill for that category is at 203 or higher.
Phase 2 Retribution Paladin Pre BiS
Neck: Strength or Tiger Enchantments Green Necklace (World loot) & High Tide Choker (Drop from "Baron Aquanis" in Blackfathom Deeps)Shoulders: Failed Flying Experiment (Obtained from Feralas quest "Rescue OOX-22/FE")Back: Strength or Tiger Enchantments Green Cloak (World loot) & Blooddrenched Drape (Acquired from "The Blood moon" event in Stranglethorn Vale)Chest: Warforged Chestplate (Reward from Badlands quest "Tremors of the Earth") & Shifting Silver Breastplate (Requires Blacksmithing 175)Wrists: Berserker Bracers (Purchased from Silverwing Supply Officer) & Ironaya's Bracers (Drop from "Ironaya" in Uldaman) & Strength or Tiger Enchantments Green Bracers (World loot)Hands: Gloves of Holy Might (World loot) & Plated Fist of Hakoo (World loot) & Cragfists (Drop from "Ancient Stone Keeper" in Uldaman) & Pratt's Handcrafted Gloves (Reward from Feralas quest "The Mark of Quality") & Gauntlets of Divinity (Drop from "Scarlet Commander Mograine" in Cathedral of Scarlet Monastery)Waist: Boar Champion's Belt (Drop from "Ragglesnout" in Razorfen Downs) & Highlander's Plate Girdle (Purchased from League of Arathor Supply Officer)Legs: Centurion Legplates (Reward from Searing Gorge quest "Rise, Obsidion!") & Scarlet Leggings (Drop from "Herod" in Armory of Scarlet Monastery & Drop from "Scarlet Commander Mograine" in Cathedral of Scarlet Monastery)Feet: Shinkicker Boots (Reward from Booty Bay quest "Deliver to MacKinley")Ring A: lvl 38 Protector's Band (Purchased from Silverwing Supply Officer)Ring B: Thunderbrow Ring (World loot) & lvl 28 Protector's Band (Purchased from Silverwing Supply Officer) & Strength or Tiger Enchantments Green Ring (World loot)Trinket A: Avenger's Void Pearl (Quest reward from Blackfathom Deeps "Aku'mai")Trinket B: Limited options available, but any trinket is better than none.
Phase 2 Retribution Paladin BiS
Head: Tempered Interference-Negating Helmet (Requires Blacksmithing 225) & Raging Berserker's Helm (Drop from "Herod" in Armory of Scarlet Monastery)Shoulders: Troggslayer Pauldrons (Drop from "Grubbis" in Gnomeregan)Back: Hazecover Cloak (Drop from "Viscous Fallout" in Gnomeregan)Chest, Legs, Feet: Insulated Chestguard & Insulated Legguards & Insulated Workboots or H.A.Z.A.R.D. Breastplate & H.A.Z.A.R.D. Legplates & H.A.Z.A.R.D. Boots (Acquired from Gnomeregan bosses by exchanging Power Depleted Chest, Legs, and Boots)Wrists: Berserker Bracers (Purchased from Silverwing Supply Officer) & Experimental Aim Stabilizers (Drop from "Crowd Pummeler 9-60" in Gnomeregan)Hands: Grubby Gauntlets (Drop from "Grubbis" in Gnomeregan) for non-mechanical mobs & Machinist's Gloves (Drop from "Electrocutioner 6000" in Gnomeregan) for mechanical mobsWaist: Hyperconductive Goldwrap (Requires Engineering 225) & Power-Assisted Lifting Belt (Drop from "The Mechanical Menagerie" in Gnomeregan) & Darkvision Girdle (Drop from "The Mechanical Menagerie" in Gnomeregan)Ring A: lvl 38 Protector's Band (Purchased from Silverwing Supply Officer)Trinket A: Avenger's Void Pearl (Quest reward from Blackfathom Deeps "Aku'mai")Trinket B: Gyromatic Experiment 420b (Drop from "Mekgineer Thermaplugg" in Gnomeregan) - Note: Use the effect sparingly.Other trinkets: Domesticated Attack Chicken (Drop from "Mekgineer Thermaplugg" in Gnomeregan) - Provides a stable 5% attack speed buff for the Group.
Team Buffs Directly Associated with Paladin DPS Output
Paladin: Improved Blessing of Might. Sanctity Aura. Crusader's Judgment. Judgement of Wisdom. Blessing of Salvation.Feral Druid: Wild Strikes. Wild Mark. Leader of the Pack. Faerie FireBerserk Warrior: Improved Battle ShoutHunter: Heart of the LionPriest: HomunculiWarlock: Curse of Recklessness. Demonic Pact (Hard to get)Mage: Arcane WisdomBalance Druid: 3% spell damage (impossible to get)
Phase 2 Retribution Paladin: Professions, Enchantments, and Consumables
Professions for Retribution PaladinBlacksmithing & Engineering & Enchanting - 3 choose 2- Note: If not learning Blacksmithing, Raging Berserker's Helm is the only suitable option, as Gnomeregan does not have any other helmets suitable for Retribution Paladins.- Note: If using Seal Dance, there are limited opportunities to use engineering bombs.- Note: The Sigil of Innovation enchantment can provide Retribution Paladins with 20 attack power and 20 spell power, but this effect only lasts for 30 minutes and has a cooldown of 30 minutes, meaning you cannot pre-buff.
Enchantments for Retribution Paladin
Weapon: Iron Counterweight (provides 3% attack speed, crafted by Blacksmithing, available in the auction house) Dismantle (may deal 60-90 damage to mechanical targets when hit)Note: If you are an enchanter, you can try using Iron Counterweight for the first 2 bosses and Dismantle for the last 4 bosses. If you are not an enchanter, you can use Iron Counterweight for all bosses because the benefits of Dismantle are questionable.Back: Lesser Agility (+3 agility)Chest: Lesser Stats (+2 to all stats)Wrist: Strength (+5 strength)Hands: Strength (+5 strength)Feet: Lesser Agility (+3 agility)
Consumables for Retribution Paladin:
Dragonbreath Chili: Vital for Retribution Paladins, the effects are best experienced.Scroll of Strength II: Grants +9 strength. Note: Currently, only II is available, not III.Elixir of Agility: Grants +15 agility.Lesser Arcane Elixir: Grants +14 spell power.Bogling Root: Grants +1 weapon damage.Elixir of Firepower: Grants +10 fire spell power. Note: Can enhance the damage of Dragonbreath Chili.Elixir of Fortitude & Elixir of Greater Defense: Potions for survival.Superior Healing Potion & Greater Mana Potion: For emergency use.Oil of Immolation: Provides stable AoE damage, with no cooldown, but resets normal attacks when used.
The above information covers the research part of Phase 2 Retribution Paladin PvE. I hope it helps players. MMOJUGG currently offers Season of Discovery gold purchases. Welcome to place your orders. For US server players, click on "wow sod gold" to order, and for EU server players, click on "wow sod gold eu" to order. Discount code: mmojugg.
Seal of Martyrdom
Trigger Mechanism:
A. A single hit of normal attack can trigger one strike of Seal of Martyrdom with a 100% chance.
B. Damage type is holy damage, ignoring armor, affected by Sanctity Aura, and may be partially resisted.
C. Damage is determined as physical, affected by melee physical critical strikes, hit chance, with a base critical damage of 200%, influenced by Two-Handed Weapon Specialization talent, and may be dodged or parried.
Damage Bonus:
A. Attack power bonus is calculated based on standard weapon speed (3.3 for two-handed weapons & 2.4 for one-handed weapons), meaning the faster the base weapon speed, the higher the DPS of Seal of Martyrdom.
B. Currently not affected by any spell power bonuses.
Trigger Conditions:
Can trigger Wild Strikes. Can trigger The Art of War upon critical hits. Can trigger various hit effects.
Judgement of Martyrdom:
A. Judgment mechanism is similar to Seal of Martyrdom, but instances of misses, dodges, or parries have not been observed.
B. Damage bonus is calculated based on non-standard weapon speed (i.e., based on weapon base attack speed), slightly weakening the damage of fast weapons with Judgement of Martyrdom, but not enough to reverse their advantages.
C. Can trigger Wild Strikes, The Art of War upon critical hits, and various hit effects.
Seal of Command
Trigger Mechanism:
A. A single hit of normal attack can trigger one strike of Seal of Command with a probability per minute (PPM) of 7, meaning the slower the base weapon speed, the higher the probability of triggering Seal of Command per hit.
B. Other Trigger mechanisms are consistent with Seal of Martyrdom.
Damage Bonus:
A. Attack power bonus is calculated based on non-standard weapon speed, combined with the PPM mechanism, meaning the slower the base weapon speed, the higher the DPS of Seal of Command.
B. According to previous data, Seal of Command itself is affected by a 20% spell power & 29% holy spell power bonus, slightly weakening the advantage of slow weapons with Seal of Command, but not enough to reverse it.
Trigger Conditions:
Can trigger Wild Strikes. Can trigger The Art of War upon critical hits. Can trigger various hit effects. Has a brief internal cooldown, meaning when Wild Strikes is triggered, Retribution Paladins can only deal Seal of Command damage once at most.
Judgement of Command:
A. Trigeer mechanism is consistent with Judgement of Martyrdom.
B. Damage bonus is not directly affected by attack power, only by spell power bonuses, with the bonus ratio calculated based on instant cast spells (i.e., 1.5/3.5).
C. Can trigger Wild Strikes, The Art of War upon critical hits, and various hit effects.
Seal of Righteousness
Trigger Mechanism:
A. A single hit of normal attack can trigger one instance of Seal of Righteousness damage with a 100% chance.
B. Damage type is holy damage, ignoring armor, affected by the aura Sanctity Aura, and may be partially resisted.
C. The damage judgment is unique, with a 100% hit chance, cannot critically strike, and is not affected by Two-Handed Weapon Specialization talent.
Damage Bonus:
A. Not directly affected by attack power.
B. Affected by a 20% bonus for one-handed weapons and a 24% bonus for two-handed weapons based on spell power.
Trigger Conditions:
A. Current data does not support triggering Wild Strikes.
B. No critical hits, therefore cannot trigger The Art of War.
C. Can trigger various hit effects.
Judgement of Justice:
A. Judgment mechanism can roughly be considered as a spell attack.
B. Damage bonus is not directly affected by attack power, only by spell power bonuses, with a bonus ratio based on previous data being 50%.
C. Current data does not support triggering Wild Strikes. Cannot trigger The Art of War upon critical hits. Current data does not support triggering various hit effects.
Seal Dance:
Seal Dance for Retribution Paladins refers to "Seal CD clipping," where the BUFF effect of all Seals, particularly Seal of Command, delays its disappearance by 0.4 seconds when switching to any other Seal. This allows for maintaining the normal attack effect of two Seals during the switch.A. Blizzard partially retains the Seal Dance mechanism in SoD, where switching Seals temporarily delays for 0.4 seconds. If you hit the target with a normal attack during this time, the attack will trigger the effects of two different Seals.
B. Blizzard only retains bi-directional switching between Seal of Martyrdom and Seal of Righteousness & Seal of Command and Seal of Righteousness for damage-oriented Seals.
C. Seal Dance can be an effective supplement to any output strategy for Retribution Paladins. However, it's worth noting that if Blizzard does not continue to adjust the related content of Seal Dance in the future, the space for its use will gradually diminish as The Art of War trigger rate increases. However, this is not applicable in Phase 2.
Other Skills
Crusader Strike:
A. A single purely physical attack with attack power bonus calculated based on standard weapon speed.
B. Cannot trigger any Seal damage.
C. Can trigger Wild Strikes, The Art of War upon critical hits, and various hit effects.
Divine Storm:
A. A single purely physical attack with attack power bonus calculated based on non-standard weapon speed.
B. Cannot trigger any Seal damage.
C. Can trigger Wild Strikes, The Art of War upon critical hits, and various hit effects.
Exorcism:
A single purely spell attack with spell power bonus calculated based on instant cast spells.
Phase 2 Retribution Paladins do not utilize Holy Shock or Consecration due to a lack of talent points to support them. Holy Shock has not been found to be a feasible output skill for Retribution Paladins until Blizzard makes significant modifications.
DPS Output Strategy
Seal of Martyrdom
Basic Priority:
Exorcism > Crusader Strike > Judgement of MartyrdomPriority with Seal Dance:
Ensure Seal of Martyrdom coverage during normal attacks through Seal Dance or Judgement of Justice > Exorcism > Crusader Strike > Judgement > Seal Dancing to Seal of Righteousness
Seal of CommandBasic Priority:
Exorcism > Judgement of Command > Crusader Strike > Holy ShockPriority with Seal Dance:
Exorcism > Ensure Seal of Command coverage during normal attacks through Seal Dance > Judgement of Command > Crusader Strike > Holy Shock > Seal Dancing to Seal of RighteousnessSustainability Issues
- With Judgement of Wisdom, Retribution Paladins have almost no sustainability issues when using Seal of Martyrdom for output, as mana overflow is evident.- When Judgement of Wisdom is unavailable, prepare Major Mana Potions. With a willingness to use them, sustainability pressure is minimal.- Considering the Paladin's own DPS, if there is only one Retribution Paladin in the raid group, prioritize maintaining Crusader Strike.
Phase 2 Retribution Paladin Runes & Talents
Phase 2 Retribution Paladin Runes - Virtually No Room for ChoiceChest:
Seal of Martyrdom Rune Or Holy Shock Rune
Waist:
Sheath of Light RuneLegs:
Exorcist RuneFeet:
The Art of War RuneHands:
Crusader Strike Rune
Phase 2 Retribution Paladin Talents - Almost Fixed1/0/30Holy Talent Tree: 1 PointFirst Layer: Divine Strength (1/5)
Retribution Talent Tree: 30 PointsFirst Layer: Improved Blessing of Might (5/5) & Benediction (3/5);Second Layer: Improved Judgement (2/2) & Improved Seal of the Crusader (3/3) & Deflection (0/5);Third Layer: Vindication (0/3) & Conviction (5/5) & Seal of Command (1/1) & Pursuit of Justice (2/2)Fourth Layer: Eye of an Eye (0/2) & Improved Retribution Aura (0/2)Fifth Layer: Two-handed Weapon Specialization (3/3) & Sanctity Aura (1/1)Sixth Layer: Vengeance (5/5)
The 3 points in Benediction can be reallocated to other talents you find potentially useful.
Phase 2 Retribution Paladin Weapon SelectionSeal of Martyrdom
Best: Automatic Crowd Pummeler
Obtainment Method: Drop from "Crowd Pummeler 9-60" in GnomereganDescription: In the hands of a Retribution Paladin, the Automatic Crowd Pummeler outperforms even the Feral Druid. While it may only be exceptionally effective for Feral Druids, for Retribution Paladins, it is unparalleled in its overall strength. This is truly a legendary weapon.
Second Best: The Jackhammer
Obtainment Method: Drop from mobs in Uldaman & purchase from the auction houseDescription: With a base trigger rate of approximately 5%, The Jackhammer can be triggered by Retribution Paladins in various ways, resulting in an average coverage rate of about 35%. It's an epic weapon without a global cooldown like Dragonspine Trophy, but it falls short of the Automatic Crowd Pummeler.
For Phase 2 Retribution Paladins, the base DPS gain from weapons is relatively low. Before using any weapon, ensure that the weapon skill for that category is at 203 or higher.
Phase 2 Retribution Paladin Pre BiS
Neck: Strength or Tiger Enchantments Green Necklace (World loot) & High Tide Choker (Drop from "Baron Aquanis" in Blackfathom Deeps)Shoulders: Failed Flying Experiment (Obtained from Feralas quest "Rescue OOX-22/FE")Back: Strength or Tiger Enchantments Green Cloak (World loot) & Blooddrenched Drape (Acquired from "The Blood moon" event in Stranglethorn Vale)Chest: Warforged Chestplate (Reward from Badlands quest "Tremors of the Earth") & Shifting Silver Breastplate (Requires Blacksmithing 175)Wrists: Berserker Bracers (Purchased from Silverwing Supply Officer) & Ironaya's Bracers (Drop from "Ironaya" in Uldaman) & Strength or Tiger Enchantments Green Bracers (World loot)Hands: Gloves of Holy Might (World loot) & Plated Fist of Hakoo (World loot) & Cragfists (Drop from "Ancient Stone Keeper" in Uldaman) & Pratt's Handcrafted Gloves (Reward from Feralas quest "The Mark of Quality") & Gauntlets of Divinity (Drop from "Scarlet Commander Mograine" in Cathedral of Scarlet Monastery)Waist: Boar Champion's Belt (Drop from "Ragglesnout" in Razorfen Downs) & Highlander's Plate Girdle (Purchased from League of Arathor Supply Officer)Legs: Centurion Legplates (Reward from Searing Gorge quest "Rise, Obsidion!") & Scarlet Leggings (Drop from "Herod" in Armory of Scarlet Monastery & Drop from "Scarlet Commander Mograine" in Cathedral of Scarlet Monastery)Feet: Shinkicker Boots (Reward from Booty Bay quest "Deliver to MacKinley")Ring A: lvl 38 Protector's Band (Purchased from Silverwing Supply Officer)Ring B: Thunderbrow Ring (World loot) & lvl 28 Protector's Band (Purchased from Silverwing Supply Officer) & Strength or Tiger Enchantments Green Ring (World loot)Trinket A: Avenger's Void Pearl (Quest reward from Blackfathom Deeps "Aku'mai")Trinket B: Limited options available, but any trinket is better than none.
Phase 2 Retribution Paladin BiS
Head: Tempered Interference-Negating Helmet (Requires Blacksmithing 225) & Raging Berserker's Helm (Drop from "Herod" in Armory of Scarlet Monastery)Shoulders: Troggslayer Pauldrons (Drop from "Grubbis" in Gnomeregan)Back: Hazecover Cloak (Drop from "Viscous Fallout" in Gnomeregan)Chest, Legs, Feet: Insulated Chestguard & Insulated Legguards & Insulated Workboots or H.A.Z.A.R.D. Breastplate & H.A.Z.A.R.D. Legplates & H.A.Z.A.R.D. Boots (Acquired from Gnomeregan bosses by exchanging Power Depleted Chest, Legs, and Boots)Wrists: Berserker Bracers (Purchased from Silverwing Supply Officer) & Experimental Aim Stabilizers (Drop from "Crowd Pummeler 9-60" in Gnomeregan)Hands: Grubby Gauntlets (Drop from "Grubbis" in Gnomeregan) for non-mechanical mobs & Machinist's Gloves (Drop from "Electrocutioner 6000" in Gnomeregan) for mechanical mobsWaist: Hyperconductive Goldwrap (Requires Engineering 225) & Power-Assisted Lifting Belt (Drop from "The Mechanical Menagerie" in Gnomeregan) & Darkvision Girdle (Drop from "The Mechanical Menagerie" in Gnomeregan)Ring A: lvl 38 Protector's Band (Purchased from Silverwing Supply Officer)Trinket A: Avenger's Void Pearl (Quest reward from Blackfathom Deeps "Aku'mai")Trinket B: Gyromatic Experiment 420b (Drop from "Mekgineer Thermaplugg" in Gnomeregan) - Note: Use the effect sparingly.Other trinkets: Domesticated Attack Chicken (Drop from "Mekgineer Thermaplugg" in Gnomeregan) - Provides a stable 5% attack speed buff for the Group.
Team Buffs Directly Associated with Paladin DPS Output
Paladin: Improved Blessing of Might. Sanctity Aura. Crusader's Judgment. Judgement of Wisdom. Blessing of Salvation.Feral Druid: Wild Strikes. Wild Mark. Leader of the Pack. Faerie FireBerserk Warrior: Improved Battle ShoutHunter: Heart of the LionPriest: HomunculiWarlock: Curse of Recklessness. Demonic Pact (Hard to get)Mage: Arcane WisdomBalance Druid: 3% spell damage (impossible to get)
Phase 2 Retribution Paladin: Professions, Enchantments, and Consumables
Professions for Retribution PaladinBlacksmithing & Engineering & Enchanting - 3 choose 2- Note: If not learning Blacksmithing, Raging Berserker's Helm is the only suitable option, as Gnomeregan does not have any other helmets suitable for Retribution Paladins.- Note: If using Seal Dance, there are limited opportunities to use engineering bombs.- Note: The Sigil of Innovation enchantment can provide Retribution Paladins with 20 attack power and 20 spell power, but this effect only lasts for 30 minutes and has a cooldown of 30 minutes, meaning you cannot pre-buff.
Enchantments for Retribution Paladin
Weapon: Iron Counterweight (provides 3% attack speed, crafted by Blacksmithing, available in the auction house) Dismantle (may deal 60-90 damage to mechanical targets when hit)Note: If you are an enchanter, you can try using Iron Counterweight for the first 2 bosses and Dismantle for the last 4 bosses. If you are not an enchanter, you can use Iron Counterweight for all bosses because the benefits of Dismantle are questionable.Back: Lesser Agility (+3 agility)Chest: Lesser Stats (+2 to all stats)Wrist: Strength (+5 strength)Hands: Strength (+5 strength)Feet: Lesser Agility (+3 agility)
Consumables for Retribution Paladin:
Dragonbreath Chili: Vital for Retribution Paladins, the effects are best experienced.Scroll of Strength II: Grants +9 strength. Note: Currently, only II is available, not III.Elixir of Agility: Grants +15 agility.Lesser Arcane Elixir: Grants +14 spell power.Bogling Root: Grants +1 weapon damage.Elixir of Firepower: Grants +10 fire spell power. Note: Can enhance the damage of Dragonbreath Chili.Elixir of Fortitude & Elixir of Greater Defense: Potions for survival.Superior Healing Potion & Greater Mana Potion: For emergency use.Oil of Immolation: Provides stable AoE damage, with no cooldown, but resets normal attacks when used.
The above information covers the research part of Phase 2 Retribution Paladin PvE. I hope it helps players. MMOJUGG currently offers Season of Discovery gold purchases. Welcome to place your orders. For US server players, click on "wow sod gold" to order, and for EU server players, click on "wow sod gold eu" to order. Discount code: mmojugg.
Basic Priority:
Priority with Seal Dance:
Basic Priority:
Priority with Seal Dance:
Phase 2 Retribution Paladin Runes & Talents
Phase 2 Retribution Paladin Runes - Virtually No Room for Choice
Chest:
Seal of Martyrdom Rune Or Holy Shock RuneWaist:
Sheath of Light RuneLegs:
Exorcist RuneFeet:
The Art of War RuneHands:
Crusader Strike RunePhase 2 Retribution Paladin Talents - Almost Fixed
1/0/30
Holy Talent Tree: 1 Point
First Layer: Divine Strength (1/5)
Retribution Talent Tree: 30 Points
First Layer: Improved Blessing of Might (5/5) & Benediction (3/5);
Second Layer: Improved Judgement (2/2) & Improved Seal of the Crusader (3/3) & Deflection (0/5);
Third Layer: Vindication (0/3) & Conviction (5/5) & Seal of Command (1/1) & Pursuit of Justice (2/2)
Fourth Layer: Eye of an Eye (0/2) & Improved Retribution Aura (0/2)
Fifth Layer: Two-handed Weapon Specialization (3/3) & Sanctity Aura (1/1)
Sixth Layer: Vengeance (5/5)
The 3 points in Benediction can be reallocated to other talents you find potentially useful.
Phase 2 Retribution Paladin Weapon SelectionSeal of Martyrdom
Best: Automatic Crowd Pummeler
Obtainment Method: Drop from "Crowd Pummeler 9-60" in GnomereganDescription: In the hands of a Retribution Paladin, the Automatic Crowd Pummeler outperforms even the Feral Druid. While it may only be exceptionally effective for Feral Druids, for Retribution Paladins, it is unparalleled in its overall strength. This is truly a legendary weapon.
Second Best: The Jackhammer
Obtainment Method: Drop from mobs in Uldaman & purchase from the auction houseDescription: With a base trigger rate of approximately 5%, The Jackhammer can be triggered by Retribution Paladins in various ways, resulting in an average coverage rate of about 35%. It's an epic weapon without a global cooldown like Dragonspine Trophy, but it falls short of the Automatic Crowd Pummeler.
For Phase 2 Retribution Paladins, the base DPS gain from weapons is relatively low. Before using any weapon, ensure that the weapon skill for that category is at 203 or higher.
Phase 2 Retribution Paladin Pre BiS
Neck: Strength or Tiger Enchantments Green Necklace (World loot) & High Tide Choker (Drop from "Baron Aquanis" in Blackfathom Deeps)Shoulders: Failed Flying Experiment (Obtained from Feralas quest "Rescue OOX-22/FE")Back: Strength or Tiger Enchantments Green Cloak (World loot) & Blooddrenched Drape (Acquired from "The Blood moon" event in Stranglethorn Vale)Chest: Warforged Chestplate (Reward from Badlands quest "Tremors of the Earth") & Shifting Silver Breastplate (Requires Blacksmithing 175)Wrists: Berserker Bracers (Purchased from Silverwing Supply Officer) & Ironaya's Bracers (Drop from "Ironaya" in Uldaman) & Strength or Tiger Enchantments Green Bracers (World loot)Hands: Gloves of Holy Might (World loot) & Plated Fist of Hakoo (World loot) & Cragfists (Drop from "Ancient Stone Keeper" in Uldaman) & Pratt's Handcrafted Gloves (Reward from Feralas quest "The Mark of Quality") & Gauntlets of Divinity (Drop from "Scarlet Commander Mograine" in Cathedral of Scarlet Monastery)Waist: Boar Champion's Belt (Drop from "Ragglesnout" in Razorfen Downs) & Highlander's Plate Girdle (Purchased from League of Arathor Supply Officer)Legs: Centurion Legplates (Reward from Searing Gorge quest "Rise, Obsidion!") & Scarlet Leggings (Drop from "Herod" in Armory of Scarlet Monastery & Drop from "Scarlet Commander Mograine" in Cathedral of Scarlet Monastery)Feet: Shinkicker Boots (Reward from Booty Bay quest "Deliver to MacKinley")Ring A: lvl 38 Protector's Band (Purchased from Silverwing Supply Officer)Ring B: Thunderbrow Ring (World loot) & lvl 28 Protector's Band (Purchased from Silverwing Supply Officer) & Strength or Tiger Enchantments Green Ring (World loot)Trinket A: Avenger's Void Pearl (Quest reward from Blackfathom Deeps "Aku'mai")Trinket B: Limited options available, but any trinket is better than none.
Phase 2 Retribution Paladin BiS
Head: Tempered Interference-Negating Helmet (Requires Blacksmithing 225) & Raging Berserker's Helm (Drop from "Herod" in Armory of Scarlet Monastery)Shoulders: Troggslayer Pauldrons (Drop from "Grubbis" in Gnomeregan)Back: Hazecover Cloak (Drop from "Viscous Fallout" in Gnomeregan)Chest, Legs, Feet: Insulated Chestguard & Insulated Legguards & Insulated Workboots or H.A.Z.A.R.D. Breastplate & H.A.Z.A.R.D. Legplates & H.A.Z.A.R.D. Boots (Acquired from Gnomeregan bosses by exchanging Power Depleted Chest, Legs, and Boots)Wrists: Berserker Bracers (Purchased from Silverwing Supply Officer) & Experimental Aim Stabilizers (Drop from "Crowd Pummeler 9-60" in Gnomeregan)Hands: Grubby Gauntlets (Drop from "Grubbis" in Gnomeregan) for non-mechanical mobs & Machinist's Gloves (Drop from "Electrocutioner 6000" in Gnomeregan) for mechanical mobsWaist: Hyperconductive Goldwrap (Requires Engineering 225) & Power-Assisted Lifting Belt (Drop from "The Mechanical Menagerie" in Gnomeregan) & Darkvision Girdle (Drop from "The Mechanical Menagerie" in Gnomeregan)Ring A: lvl 38 Protector's Band (Purchased from Silverwing Supply Officer)Trinket A: Avenger's Void Pearl (Quest reward from Blackfathom Deeps "Aku'mai")Trinket B: Gyromatic Experiment 420b (Drop from "Mekgineer Thermaplugg" in Gnomeregan) - Note: Use the effect sparingly.Other trinkets: Domesticated Attack Chicken (Drop from "Mekgineer Thermaplugg" in Gnomeregan) - Provides a stable 5% attack speed buff for the Group.
Team Buffs Directly Associated with Paladin DPS Output
Paladin: Improved Blessing of Might. Sanctity Aura. Crusader's Judgment. Judgement of Wisdom. Blessing of Salvation.Feral Druid: Wild Strikes. Wild Mark. Leader of the Pack. Faerie FireBerserk Warrior: Improved Battle ShoutHunter: Heart of the LionPriest: HomunculiWarlock: Curse of Recklessness. Demonic Pact (Hard to get)Mage: Arcane WisdomBalance Druid: 3% spell damage (impossible to get)
Phase 2 Retribution Paladin: Professions, Enchantments, and Consumables
Professions for Retribution PaladinBlacksmithing & Engineering & Enchanting - 3 choose 2- Note: If not learning Blacksmithing, Raging Berserker's Helm is the only suitable option, as Gnomeregan does not have any other helmets suitable for Retribution Paladins.- Note: If using Seal Dance, there are limited opportunities to use engineering bombs.- Note: The Sigil of Innovation enchantment can provide Retribution Paladins with 20 attack power and 20 spell power, but this effect only lasts for 30 minutes and has a cooldown of 30 minutes, meaning you cannot pre-buff.
Enchantments for Retribution Paladin
Weapon: Iron Counterweight (provides 3% attack speed, crafted by Blacksmithing, available in the auction house) Dismantle (may deal 60-90 damage to mechanical targets when hit)Note: If you are an enchanter, you can try using Iron Counterweight for the first 2 bosses and Dismantle for the last 4 bosses. If you are not an enchanter, you can use Iron Counterweight for all bosses because the benefits of Dismantle are questionable.Back: Lesser Agility (+3 agility)Chest: Lesser Stats (+2 to all stats)Wrist: Strength (+5 strength)Hands: Strength (+5 strength)Feet: Lesser Agility (+3 agility)
Consumables for Retribution Paladin:
Dragonbreath Chili: Vital for Retribution Paladins, the effects are best experienced.Scroll of Strength II: Grants +9 strength. Note: Currently, only II is available, not III.Elixir of Agility: Grants +15 agility.Lesser Arcane Elixir: Grants +14 spell power.Bogling Root: Grants +1 weapon damage.Elixir of Firepower: Grants +10 fire spell power. Note: Can enhance the damage of Dragonbreath Chili.Elixir of Fortitude & Elixir of Greater Defense: Potions for survival.Superior Healing Potion & Greater Mana Potion: For emergency use.Oil of Immolation: Provides stable AoE damage, with no cooldown, but resets normal attacks when used.
The above information covers the research part of Phase 2 Retribution Paladin PvE. I hope it helps players. MMOJUGG currently offers Season of Discovery gold purchases. Welcome to place your orders. For US server players, click on "wow sod gold" to order, and for EU server players, click on "wow sod gold eu" to order. Discount code: mmojugg.
Neck: Strength or Tiger Enchantments Green Necklace (World loot) & High Tide Choker (Drop from "Baron Aquanis" in Blackfathom Deeps)
Shoulders: Failed Flying Experiment (Obtained from Feralas quest "Rescue OOX-22/FE")
Back: Strength or Tiger Enchantments Green Cloak (World loot) & Blooddrenched Drape (Acquired from "The Blood moon" event in Stranglethorn Vale)
Chest: Warforged Chestplate (Reward from Badlands quest "Tremors of the Earth") & Shifting Silver Breastplate (Requires Blacksmithing 175)
Wrists: Berserker Bracers (Purchased from Silverwing Supply Officer) & Ironaya's Bracers (Drop from "Ironaya" in Uldaman) & Strength or Tiger Enchantments Green Bracers (World loot)
Hands: Gloves of Holy Might (World loot) & Plated Fist of Hakoo (World loot) & Cragfists (Drop from "Ancient Stone Keeper" in Uldaman) & Pratt's Handcrafted Gloves (Reward from Feralas quest "The Mark of Quality") & Gauntlets of Divinity (Drop from "Scarlet Commander Mograine" in Cathedral of Scarlet Monastery)
Waist: Boar Champion's Belt (Drop from "Ragglesnout" in Razorfen Downs) & Highlander's Plate Girdle (Purchased from League of Arathor Supply Officer)
Legs: Centurion Legplates (Reward from Searing Gorge quest "Rise, Obsidion!") & Scarlet Leggings (Drop from "Herod" in Armory of Scarlet Monastery & Drop from "Scarlet Commander Mograine" in Cathedral of Scarlet Monastery)
Feet: Shinkicker Boots (Reward from Booty Bay quest "Deliver to MacKinley")
Ring A: lvl 38 Protector's Band (Purchased from Silverwing Supply Officer)
Ring B: Thunderbrow Ring (World loot) & lvl 28 Protector's Band (Purchased from Silverwing Supply Officer) & Strength or Tiger Enchantments Green Ring (World loot)
Trinket A: Avenger's Void Pearl (Quest reward from Blackfathom Deeps "Aku'mai")
Trinket B: Limited options available, but any trinket is better than none.
Phase 2 Retribution Paladin BiS
Head: Tempered Interference-Negating Helmet (Requires Blacksmithing 225) & Raging Berserker's Helm (Drop from "Herod" in Armory of Scarlet Monastery)Shoulders: Troggslayer Pauldrons (Drop from "Grubbis" in Gnomeregan)Back: Hazecover Cloak (Drop from "Viscous Fallout" in Gnomeregan)Chest, Legs, Feet: Insulated Chestguard & Insulated Legguards & Insulated Workboots or H.A.Z.A.R.D. Breastplate & H.A.Z.A.R.D. Legplates & H.A.Z.A.R.D. Boots (Acquired from Gnomeregan bosses by exchanging Power Depleted Chest, Legs, and Boots)Wrists: Berserker Bracers (Purchased from Silverwing Supply Officer) & Experimental Aim Stabilizers (Drop from "Crowd Pummeler 9-60" in Gnomeregan)Hands: Grubby Gauntlets (Drop from "Grubbis" in Gnomeregan) for non-mechanical mobs & Machinist's Gloves (Drop from "Electrocutioner 6000" in Gnomeregan) for mechanical mobsWaist: Hyperconductive Goldwrap (Requires Engineering 225) & Power-Assisted Lifting Belt (Drop from "The Mechanical Menagerie" in Gnomeregan) & Darkvision Girdle (Drop from "The Mechanical Menagerie" in Gnomeregan)Ring A: lvl 38 Protector's Band (Purchased from Silverwing Supply Officer)Trinket A: Avenger's Void Pearl (Quest reward from Blackfathom Deeps "Aku'mai")Trinket B: Gyromatic Experiment 420b (Drop from "Mekgineer Thermaplugg" in Gnomeregan) - Note: Use the effect sparingly.Other trinkets: Domesticated Attack Chicken (Drop from "Mekgineer Thermaplugg" in Gnomeregan) - Provides a stable 5% attack speed buff for the Group.
Team Buffs Directly Associated with Paladin DPS Output
Paladin: Improved Blessing of Might. Sanctity Aura. Crusader's Judgment. Judgement of Wisdom. Blessing of Salvation.Feral Druid: Wild Strikes. Wild Mark. Leader of the Pack. Faerie FireBerserk Warrior: Improved Battle ShoutHunter: Heart of the LionPriest: HomunculiWarlock: Curse of Recklessness. Demonic Pact (Hard to get)Mage: Arcane WisdomBalance Druid: 3% spell damage (impossible to get)
Phase 2 Retribution Paladin: Professions, Enchantments, and Consumables
Professions for Retribution PaladinBlacksmithing & Engineering & Enchanting - 3 choose 2- Note: If not learning Blacksmithing, Raging Berserker's Helm is the only suitable option, as Gnomeregan does not have any other helmets suitable for Retribution Paladins.- Note: If using Seal Dance, there are limited opportunities to use engineering bombs.- Note: The Sigil of Innovation enchantment can provide Retribution Paladins with 20 attack power and 20 spell power, but this effect only lasts for 30 minutes and has a cooldown of 30 minutes, meaning you cannot pre-buff.
Enchantments for Retribution Paladin
Weapon: Iron Counterweight (provides 3% attack speed, crafted by Blacksmithing, available in the auction house) Dismantle (may deal 60-90 damage to mechanical targets when hit)Note: If you are an enchanter, you can try using Iron Counterweight for the first 2 bosses and Dismantle for the last 4 bosses. If you are not an enchanter, you can use Iron Counterweight for all bosses because the benefits of Dismantle are questionable.Back: Lesser Agility (+3 agility)Chest: Lesser Stats (+2 to all stats)Wrist: Strength (+5 strength)Hands: Strength (+5 strength)Feet: Lesser Agility (+3 agility)
Consumables for Retribution Paladin:
Dragonbreath Chili: Vital for Retribution Paladins, the effects are best experienced.Scroll of Strength II: Grants +9 strength. Note: Currently, only II is available, not III.Elixir of Agility: Grants +15 agility.Lesser Arcane Elixir: Grants +14 spell power.Bogling Root: Grants +1 weapon damage.Elixir of Firepower: Grants +10 fire spell power. Note: Can enhance the damage of Dragonbreath Chili.Elixir of Fortitude & Elixir of Greater Defense: Potions for survival.Superior Healing Potion & Greater Mana Potion: For emergency use.Oil of Immolation: Provides stable AoE damage, with no cooldown, but resets normal attacks when used.
The above information covers the research part of Phase 2 Retribution Paladin PvE. I hope it helps players. MMOJUGG currently offers Season of Discovery gold purchases. Welcome to place your orders. For US server players, click on "wow sod gold" to order, and for EU server players, click on "wow sod gold eu" to order. Discount code: mmojugg.
Paladin: Improved Blessing of Might. Sanctity Aura. Crusader's Judgment. Judgement of Wisdom. Blessing of Salvation.
Feral Druid: Wild Strikes. Wild Mark. Leader of the Pack. Faerie Fire
Berserk Warrior: Improved Battle Shout
Hunter: Heart of the Lion
Priest: Homunculi
Warlock: Curse of Recklessness. Demonic Pact (Hard to get)
Mage: Arcane Wisdom
Balance Druid: 3% spell damage (impossible to get)
Phase 2 Retribution Paladin: Professions, Enchantments, and Consumables
Professions for Retribution PaladinBlacksmithing & Engineering & Enchanting - 3 choose 2- Note: If not learning Blacksmithing, Raging Berserker's Helm is the only suitable option, as Gnomeregan does not have any other helmets suitable for Retribution Paladins.- Note: If using Seal Dance, there are limited opportunities to use engineering bombs.- Note: The Sigil of Innovation enchantment can provide Retribution Paladins with 20 attack power and 20 spell power, but this effect only lasts for 30 minutes and has a cooldown of 30 minutes, meaning you cannot pre-buff.
Enchantments for Retribution Paladin
Weapon: Iron Counterweight (provides 3% attack speed, crafted by Blacksmithing, available in the auction house) Dismantle (may deal 60-90 damage to mechanical targets when hit)Note: If you are an enchanter, you can try using Iron Counterweight for the first 2 bosses and Dismantle for the last 4 bosses. If you are not an enchanter, you can use Iron Counterweight for all bosses because the benefits of Dismantle are questionable.Back: Lesser Agility (+3 agility)Chest: Lesser Stats (+2 to all stats)Wrist: Strength (+5 strength)Hands: Strength (+5 strength)Feet: Lesser Agility (+3 agility)
Consumables for Retribution Paladin:
Dragonbreath Chili: Vital for Retribution Paladins, the effects are best experienced.Scroll of Strength II: Grants +9 strength. Note: Currently, only II is available, not III.Elixir of Agility: Grants +15 agility.Lesser Arcane Elixir: Grants +14 spell power.Bogling Root: Grants +1 weapon damage.Elixir of Firepower: Grants +10 fire spell power. Note: Can enhance the damage of Dragonbreath Chili.Elixir of Fortitude & Elixir of Greater Defense: Potions for survival.Superior Healing Potion & Greater Mana Potion: For emergency use.Oil of Immolation: Provides stable AoE damage, with no cooldown, but resets normal attacks when used.
The above information covers the research part of Phase 2 Retribution Paladin PvE. I hope it helps players. MMOJUGG currently offers Season of Discovery gold purchases. Welcome to place your orders. For US server players, click on "wow sod gold" to order, and for EU server players, click on "wow sod gold eu" to order. Discount code: mmojugg.
Table of Content
 WoW SoD Gold
 WoW SoD Items
 WoW SoD Boosting