Seamlessly Import & Export .build Files: Ultimate PoE2 Build Planner Guide
Last updated on May 31, 2026 by MMOJUGG Team | Game: PoE2 (Runes of Aldur 0.5.0) Guide | Tags: PoE 2 Tools
Path of Exile 2's character building is massive and notoriously complex. For a long time, following a guide meant constantly switching between your game and a browser tab. The 0.5.0 Return of the Ancients update finally fixed this with the official in-game Build Planner and its new .build file format.
This isn't just a minor tweak; it changes how you actually play. You can now load community builds straight into the game client. You'll see the passive skill tree, gem setups, and ascendancy choices exactly where they belong—inside the game. It makes the whole process feel less like a research project and more like a game, allowing you to experiment with different builds without the usual friction.
In this guide, I'll break down what the .build file is, how the .build format works, where to grab files from major platforms like poe.ninja, Maxroll and Mobalytics, and the exact steps to import it to your game client. and how to export your own PoB setups to .build format.
What is the Path of Exile 2 Build Planner and .build Format?
The Build Planner is a game-wide build instructor that integrates with mission-critical systems such as skills, crafting, passives, and ascendancy.
Designed for players to import builds from third-party sources, it functions as a plug-and-play feature. It allows you to directly introduce a brand-new style planner system into the game. Guide creators can now export their work in a new archive format: the .build format.

How It Works
The system relies on an automated File Watcher system designed to detect changes in the Preferences/BuildPlanner directory. Once you have downloaded a valid .build file and placed it in the correct folder, the game program will detect it, and all features of the Build Planner will be activated and visible.
The Build Planner provides a smoother experience when following different playstyles. Inside the game client, you will see the complete talent tree, ascendancy options, skill gems, and recommended support gem combinations.
Key Features of the System
Integrated Interface: See all the information you need to play a specific genre exactly where it belongs.
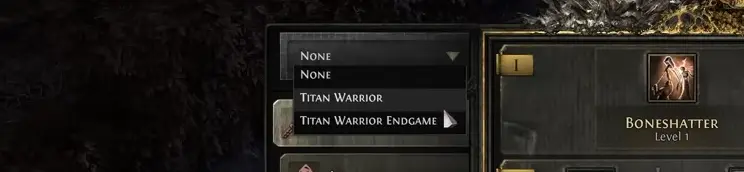
Drop-down Menus: Each location has a menu that allows you to select the specific genre planner you are currently following.
Multi-Guide Comparison: Easily switch between different creators to see what they recommend for the same build.
Custom Annotations: Creators can add notes almost anywhere to explain pros and cons, alternatives, or how different parts of a genre work together.
Markup Support: The format supports font styles (Bold, Italic, Underline) and a wide range of colors (Red, Gold, Unique, etc.) for better readability.
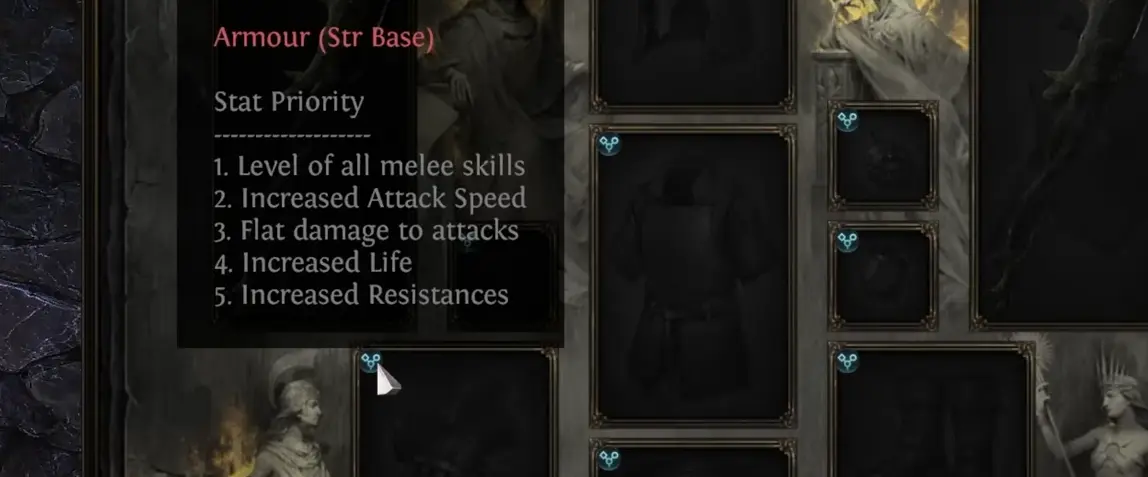
Table of Supported Elements in .build Files
The .build file is a single JSON root object. Below are the elements currently supported in Version 1 (Experimental):
Element | Key Type | Description & Extra Information |
|---|---|---|
Name/Author |
| The basic metadata identifying the build and its creator. |
Passives |
| Defines passives visible in the Passive Skill Tree. Supports level intervals and weapon sets. |
Skills |
| Defines skills accessible from Uncut Skill Gems and Spirit Gems. |
Inventory Slots |
| Shows hints on inventory slots in the character panel, including Unique names and stat priorities. |
Additional Text |
| Annotations that appear when hovering over passives, gems, or equipment slots. |
Ascendancy |
| Specifies the intended ascendancy class for the build. |
Current Limits and Technical Risks
Experimental Status: The system is currently in Version 1 (Experimental). Users should ensure their files match the JSON format exactly.
No In-Game Editing: Editing or creating builds within Path of Exile 2 is currently not supported. The game is a viewer/instructor, not an editor.
Meta Gem Limitation: Meta gems are currently not supported in the build file schema.
File Accuracy: Ensure the file extension is exactly .build. The File Watcher triggers upon detecting valid code; corrupted text will cause the file to fail to load.
Ready to start your journey? Ensure your .build files are placed in the correct directory to unlock the full potential of the Path of Exile 2 Build Planner.
How to Import .build Files into the PoE 2 Client
Importing a .build file is incredibly straightforward thanks to Path of Exile 2's automatic file-detection system. Once the file is in the correct directory, the game client handles the rest.
In this section, we'll walk through the step-by-step setup for PC, explain a critical trap regarding "build variants" (such as getting stuck with only Act 1 progress), cover console limitations, and address key troubleshooting steps.
Step-by-Step Guide for PC Players
To get your favorite community build up and running inside your game client, follow these four simple steps:

Download the
.buildFile: Navigate to your build website of choice (such as Maxroll, poe.ninja, or Mobalytics) and click the "Download Build File" or "Import Build Planner (GGG)" button to save the.buildfile to your computer.Locate Your PoE 2 Build Directory: Open your file explorer and navigate to your local documents folder. The default directory path is:
C:\Users\<YourUsername>\Documents\My Games\Path of Exile 2\BuildPlanner\Tip: If the
BuildPlannerfolder doesn't exist inside yourPath of Exile 2directory, simply right-click, create a new folder, and name it exactlyBuildPlanner.Drop the File in: Drag and drop your downloaded
.buildfile directly into this folder. You do not need to restart your game if it is already running—the background "File Watcher" will detect it instantly.Activate the In-Game Planner: Open Path of Exile 2, open your Passive Skill Tree (Default Hotkey: P), and look at the top-left corner. Click the new drop-down menu and select your imported build from the list. The planner will immediately highlight your optimal path!

The "Progression Stage" Trap
One of the most common mistakes players make when exporting from websites like Maxroll or PoE2Planner is exporting the wrong build stage.
Most comprehensive guides are broken down into progressive phases (e.g., Act 1, Act 2, Mid-Campaign, Early Endgame, and Min-Maxed).
The Issue: The exported
.buildfile only captures the active state of the web planner. If the website is currently showing the "Act 1" passive tree when you click download, your in-game planner will stop highlighting nodes once you finish Act 1.The Fix: Before clicking the export/download button on your browser, make sure you have selected the specific phase you want to follow (e.g., "Endgame" or "Level 90+").
Pro-Workflow: Download multiple files for different stages of your leveling process (e.g.,
Slammer_Campaign.buildandSlammer_Endgame.build) and place them both in your folder. You can easily hot-swap between them using the in-game drop-down menu as your character progresses.
Console Notes (PlayStation 5 & Xbox Series X/S)
Due to the closed file system restrictions on PlayStation 5 and Xbox Series X/S, the Build Planner and its .build file import functionality are currently exclusive to PC. The feature is completely unavailable on console platforms in the current version, and players will need to wait for a future official update introducing an online cloud synchronization system.
Troubleshooting & Known Limitations
Even with a smooth integration, the 0.5.0 build system has a few quirks you should keep in mind:
The "Rare Items" Limitation: Due to UI limits inside the game client, imported builds will show full details for Unique Items only. For Rare Items, the planner will only display recommended base types and critical stat priorities (e.g., "Titan Greaves - Needs Fire Res & Life").
Outdated Tree Errors: If a major patch drops (like the 0.5.0 Return of the Ancients update), passive tree layouts change. If you try to load an outdated
.buildfile, the game may fail to parse it or show misaligned node highlights.Fix: Go back to the creator's guide, refresh the planner page to force-generate the latest tree layout, delete your old
.buildfile from the directory, and download the freshly updated version.
File Extension Rigidity: Ensure the file ends strictly in
.build. If your browser accidentally appends.txtor.jsonto the end (e.g.,build_guide.build.txt), the game client's file watcher will ignore it completely.
From Theorycrafting to Pinnacle: Perfect Your League Start
Now that your Build Planner configuration is set up, the next critical hurdle is choosing a battle-tested character setup that thrives in the 0.5.0 environment. Before you lock in your choices, make sure to read our comprehensive
Once your build is finalized, the true test begins: securing the raw currency and gear to make it functional. No matter how perfect your setup looks during the theory building stage, an endgame build cannot function without the necessary item power to back it up.
Where to Get .build Files: Exporting from Major Platforms
Now that you know how to import .build files into your client, the next step is finding high-quality builds to follow. Since the release of the 0.5.0 Return of the Ancients update, the Path of Exile 2 community has rapidly integrated this format.
Currently, three major platforms dominate the PoE 2 build ecosystem: poe.ninja (for copying top-ladder character profiles), Maxroll (for highly detailed, curated leveling guides), and Mobalytics (for streamlined, community-driven builds).
Here is how to extract and customize your files from each platform.
Using poe.ninja for Top Ladder Builds (Early Prototype)
If you want to copy what the absolute best players on the ladder are doing, poe.ninja is your go-to resource. As of late May 2026, poe.ninja introduced a prototype feature that lets you export any active ladder character directly into a .build file.
The Goal: Quickly copy the exact setup of top-ranking players.
How to Export:
Open poe.ninja and navigate to the PoE 2 Builds ladder.
Click on any character profile that interests you.
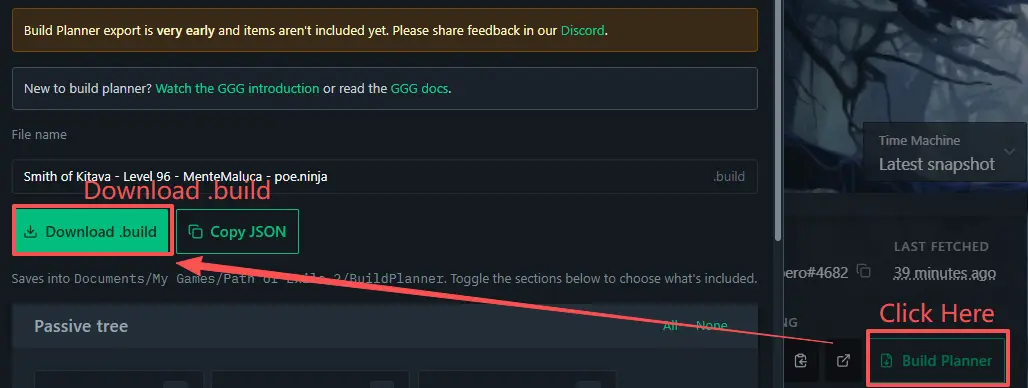
Look for the brand-new "Build Planner" button (located right next to the traditional "Path of Building" export code button).
A customization dialog box will pop up.
Name your file (it automatically defaults to a clean
[Ascendancy]_[Level]_[CharacterName]format).Click Download to save the
.buildfile directly to yourBuildPlannerdirectory, or click Copy JSON to share the raw code with a friend.
Choosing What to Include (Advanced Customization)
Unlike static guides, poe.ninja profiles can be messy. To prevent cluttering your in-game planner, the export dialog box features a highly granular checklist:
The Passive Tree Section: Shows a rendered preview of their tree. You can toggle off entire weapon sets or specific clusters if you only want their core path.
The Skills Section: Lists every single equipped skill gem along with its support links. You can uncheck minor utility setups (like portal gems or temporary buffs) so your in-game screen stays clean.
Limitations: Because this is an early prototype, items/gear are currently not included in the poe.ninja export. It is strictly for tracking Passives, Ascendancies, and Skill Gems.
Using Maxroll for Highly Curated Guides
Maxroll guides are handcrafted by professional ARPG creators. Their integration with the PoE 2 Build Planner is incredibly robust, supporting dual-weapon sets, item recommendations, and leveling phases.
The Goal: Follow an expertly paced guide with leveling steps and gear priorities.
How to Export:
Navigate to your chosen Maxroll PoE 2 build guide.
Scroll to any Gearing or Passive Tree widget (or click anywhere inside the embedded planner frame).
This will open the PoE2Planner sub-page.
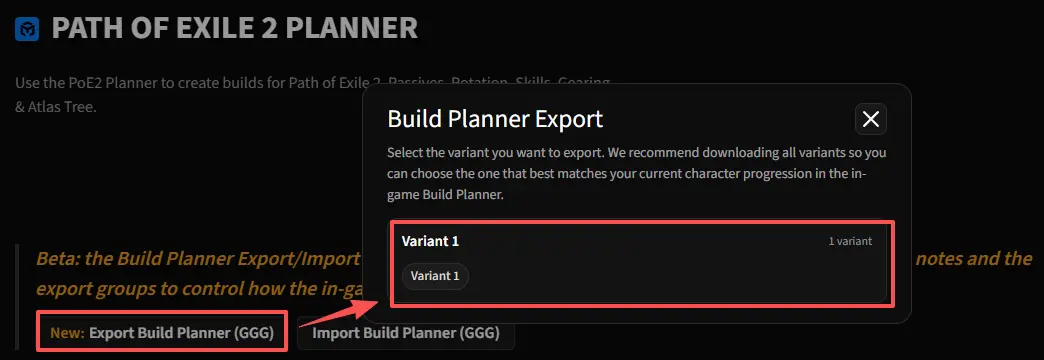
Click the "Export Build Planner (GGG)" button located at the top of the interface.
Save the generated
.buildfile directly to yourBuildPlannerfolder.
The Power of Bidirectional Importing
Maxroll also supports importing .build files back into their web interface. If you find a mystery .build file on Discord or from a friend, you can go to Maxroll's PoE2Planner, click "Import Build Planner (GGG)", upload the file, and view it inside your browser with Maxroll's clean UI layout.
What Makes Maxroll Exports Special?
Leveling Steps: Maxroll writers set "Minimum Level" thresholds on skills and gear. Your in-game client will dynamically reveal new steps as your character levels up.
Gear Annotations: Maxroll packages gear details into the file. While the in-game UI restricts rare items, Maxroll exports include hover-over notes showing vital stat priorities (e.g., "Prioritize Fire Res & Max Life on this base").
Using Mobalytics for Quick, Community-Driven Builds
If you prefer a highly streamlined user experience without wading through pages of text, Mobalytics offers an incredibly simple integration.
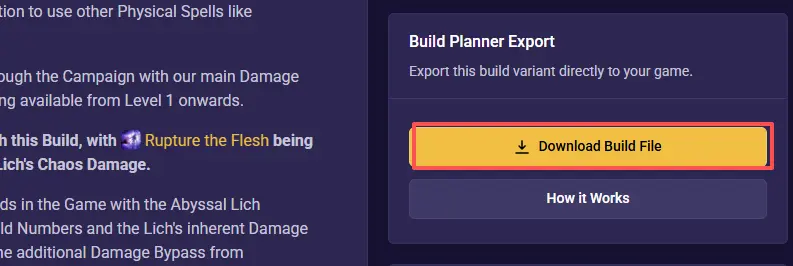
The Goal: Fast, zero-friction, one-click exports.
How to Export:
Open the PoE 2 section on Mobalytics.
Select the build guide you wish to follow.
Look for the prominent "Build Planner Export" button located directly in Sidebar.
Click it to instantly download the correct
.buildfile for that specific variant and place it into yourBuildPlannerdirectory.
Sharing Your Progress: Exporting Your Own Builds
While following community guides is incredibly useful, half the fun of Path of Exile 2 is theory-crafting your own unique characters. For years, Path of Building (PoB / PoB2) has been the absolute gold standard for planning out builds.
However, since PoB2 does not yet natively export directly to the GGG .build format, you need a quick way to bridge the gap. Luckily, the community has stepped in with highly efficient web tools to convert your custom PoB setups into files your game client can read instantly.
Here is how to generate, convert, and successfully set up your own custom .build files.
Step 1: Generate Your Code in Path of Building 2
Before you can create a .build file, you need to grab the raw data of your build from PoB2.
Open your build inside the Path of Building 2 desktop application.
Navigate to the Import/Export Build tab on the left-hand menu.
In the "Export" section, click the "Generate" button. This will create a massive, long string of code (a base64 URL-safe string).
(Alternative & Recommended) Click the "Share" button to generate a clean, shortened pobb.in link (e.g.,
https://pobb.in/90pcuxN4XtJG).Click "Copy" to save either the raw string or the short link to your clipboard.
Step 2: Convert to a .build File Using Community Tools
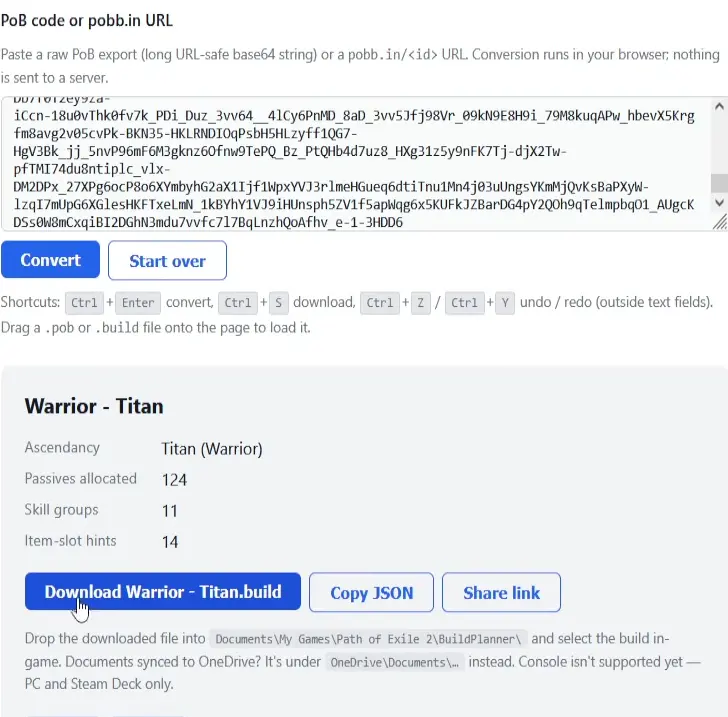
Since the PoE 2 client strictly requires the .build file extension, you must run your copied PoB code through a conversion tool.
The most popular utility for this is the community-created browser tool: poe2-build-forge.
Open poe2-build-forge (or alternative planners like poe2.dev).
Paste your code: Right-click and paste your raw PoB code or your
pobb.inURL into the main text box.Critical Note: Make sure you copy the entire code block. If even one character of the base64 code is missing, the converter won't be able to parse your build.
Click the "Convert" button. The page will immediately process the data and display your character's name/class.
Click "Download" to save your freshly generated
.buildfile (e.g.,MyCustomSlammer.build).Move this downloaded file directly into your directory:
C:\Users\<YourUsername>\Documents\My Games\Path of Exile 2\BuildPlanner\
Step 3: Activating & Verifying Your Build In-Game (Avoid the Gem Trap!)
Once the file is in your directory, load up PoE 2 and open your character. Press P to open your Passive Tree, select your custom build from the top-left drop-down, and you will see your self-made path light up in blue!
However, setting up your Skill Gems and Support Gems in the client has a minor UI quirk that trips up many players:
Quick Sharing with Friends
If you want to send your customized setup to a guild member or friend:
The Manual Way: Simply locate your
.buildfile in your Windows explorer, and drag-and-drop it to them directly via Discord. They can place it straight into their folder and play instantly.The Web Way: They can upload your
.buildfile to websites like Maxroll using the "Import Build Planner (GGG)" button to view it dynamically inside their browser.
FAQs on Path of Exile 2 Build Planner
How do I find the file location for .build files?
The .build files must be placed in the local documents folder for the game to detect them. On Windows, navigate to Documents/My Games/Path of Exile 2/BuildPlanner. If the final folder doesn't exist, you must manually create it with that exact name to trigger the automated File Watcher.
Can I use .build files on console versions of PoE 2?
No, the Build Planner file import feature is currently a PC exclusive. Due to the closed file system restrictions on PlayStation 5 and Xbox Series X/S, manual file transferring is unsupported, and there is no active cloud sync system for .build
Are .build files compatible between different game versions?
Major updates like 0.5.0 Return of the Ancients often reshape the Passive Tree layout. An outdated .build file may fail to highlight nodes correctly or point to removed skills. Always ensure you are using a file generated for the current league or patch version to ensure 100% accuracy.
Does importing a .build file automatically allocate my points?
No, the Build Planner is strictly a visual instructor. It highlights the optimal path and provides notes on what to take next, but you must manually allocate your points as you gain levels. This prevents accidental mis-speccing while giving you the freedom to deviate if necessary.
What should I do if the .build file fails to load?
First, verify the file extension is strictly .build (not .build.txt). Second, ensure the file is valid JSON format without corrupted text. If the game still doesn't see it, check that the automated File Watcher hasn't been blocked by your antivirus software and that you are running the 0.5.0 update.
Thanks for Reading
The transition from external spreadsheets to the in-game Build Planner represents a massive shift in how we approach character progression. By leveraging the .build file format, you eliminate the friction of alt-tabbing and focus entirely on the gameplay. Whether you are following a professional Maxroll guide or converting your own custom theories from PoB2, this system is your most powerful tool for conquering the campaign and endgame.
You May Also Be Interested In
Path of Building 2 Guide: Master PoE 2 Builds & Theorycrafting
Top 3 PoE2 Trading Overlays: Best Price Checkers & Trade Tools
 Buy PoE2 Currency
 PoE2 Boosting