New World S10 Nighthaven Tarot Cards All Locations
Last updated on October 17, 2025 by MMOJUGG Team | Game: New World Aeternum Guide | Tags: New World Aeternum Season 10
As you dive into the shadowy expanses of Nighthaven in New World: Aeternum's Season 10, those elusive elite chests can feel like a tantalizing promise just out of reach. If you're piecing together your collection of Tarot Arcana cards to crack them open, sticking this guide in your bookmarks could save you hours of wandering—it's designed for quick revisits during your runs. And if you're looking to bolster your setup along the way, our New World Aeternum shop has everything from Gold Coins to Trophies, matrices, and beyond to keep your momentum going strong.
The Tarot Arcana System in New World S10 Nighthaven
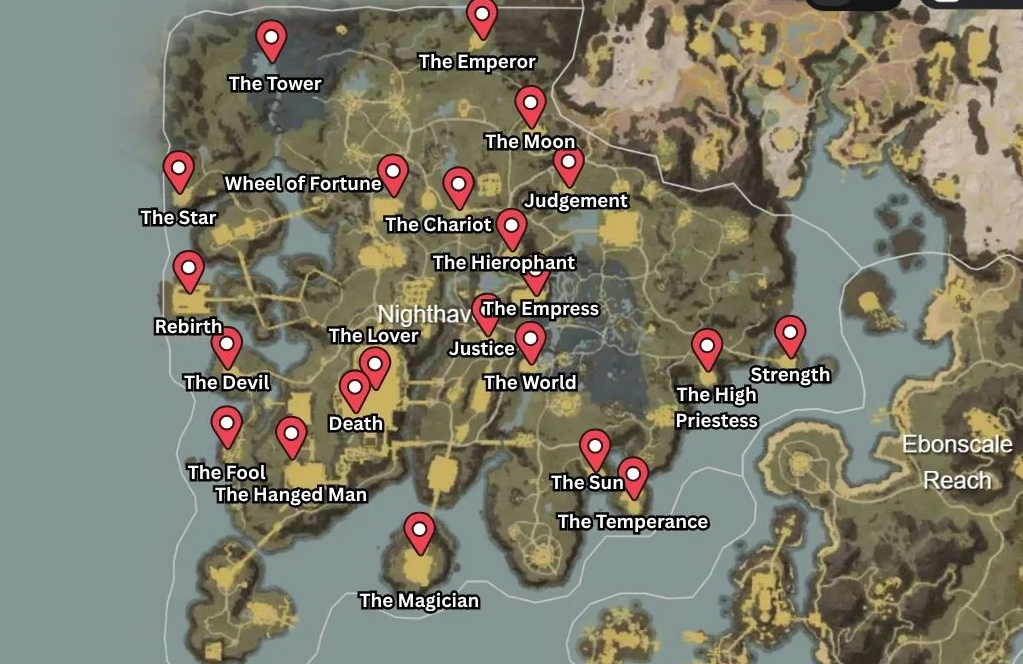
Nighthaven, the latest endgame zone introduced in Season 10, brings a fresh layer of intrigue with its Tarot Arcana cards—a set of 24 mystical collectibles inspired by ancient tarot lore, infused with Aeternum's unique twists. These cards aren't just cosmetic; they're your key to accessing elite chests scattered throughout the zone, which drop high-value loot like gear upgrades, resources, and rare artifacts. Once you've claimed a card on one character, it unlocks permanently for that toon, letting you revisit chests endlessly without re-hunting shrines. Even better, if you're grouping up and a teammate has the full set, they can pop those chests open for everyone to share the spoils—perfect for casual runs or speed farms.
Tracking your progress is straightforward: Open your journal, navigate to the Documents tab, and select Tales of Nighthaven > The Arcana Cards. You'll see a progress circle (0/24) with numbered slots for each card, making it easy to spot gaps in your collection. Many shrines overlap with main story quests (MSQ), so tackling the storyline first can net you a handful naturally—think of it as efficient multitasking. For the rest, expect a mix of exploration, light platforming, boss fights, and even some RNG elements.
If efficiency is your jam, consider a looped route starting from central fast travel points like the Church of the Cup, spiraling outward clockwise: Hit the Fool early (essential for tower access), then cluster nearby cards in the southern churches before pushing north to raid-locked ones. Teleport liberally, and save catacombs or siege events for when you're geared or grouped. This path minimizes backtracking, but feel free to adapt based on your quest progress. Pro tip: As someone who's wiped more times than I care to admit on these climbs, always scout for player traffic—Nighthaven's design encourages communal clears, turning solo grinds into social wins.
Mastering the Basic Towers
A chunk of these cards hide atop "basic towers"—multi-level structures that feel like a vertical dungeon crawl. You'll ascend via stairs, platforms, and occasional jumps, battling mobs en route until you face a summit boss with mechanics echoing soul trials (dodge telegraphs, interrupt channels, manage adds). Use The Fool card to unseal the base door, then loot elite chests along the way if you have the matching arcana. At the peak, snag your card, crack open the reward chest, and optionally hunt side collectibles like memory fragments or lore tomes tucked in alcoves. These towers respawn daily, drawing crowds for the chests, so lingering means free group support.
Not all towers are identical: Some amp the difficulty with elite mobs, others swap fights for puzzles like orb-carrying or trap-dodging. If you're undergeared, queue at the entrance for a pickup group—better safe than respawning at the bottom. Once done, glide off the edge (or "yeet" as I call it) to your next waypoint. These spots keep the zone alive, blending challenge with that satisfying "I conquered it" rush.
Collecting Every Tarot Arcana Card
Here's the breakdown for all 24, listed in numerical order for easy reference. I've included fast travel starting points, paths, and quirks to watch for—verified against community maps and guides for accuracy. Gear up, stock potions, and let's hunt.
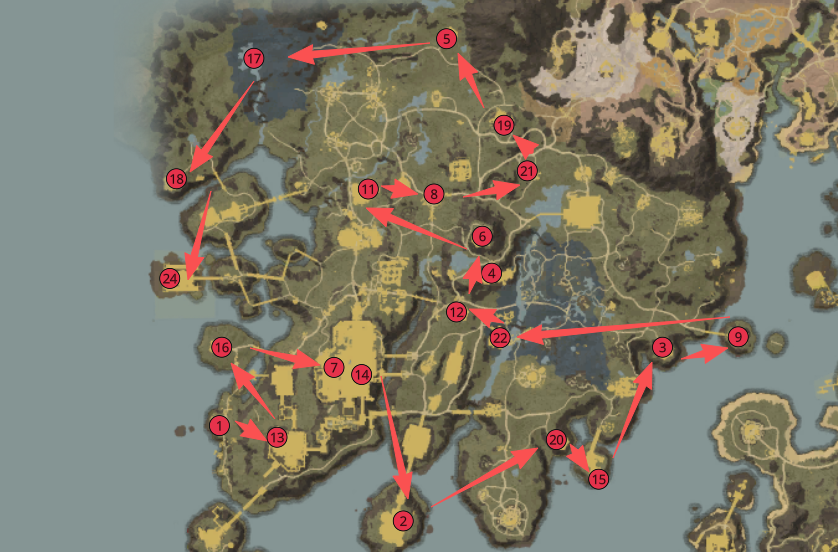
1. The Fool
This foundational card is your gateway to many towers, so prioritize it. Fast travel to the Church of the Cup and head north toward the Tower of the Fool. A straightforward jump pad sequence gets you to the shrine: Follow the directional arrows on each pad (straight for horizontal leaps, circles for upward boosts). If momentum feels off, mimic a practiced path—launch from the central platform, arc left, then spiral up. Claim it, and you're set for the climb-heavy cards ahead.
2. The Magician
Tied loosely to MSQ but easy to miss, head to the Mora Singur ruins beside the Church of the Wand fast travel. Ascend the stairs to trigger a boss encounter with the Velatrix of Vern—a spectral guardian with sweeping attacks. Defeat it to spawn a portal; step through to a dreamlike realm. Parkour to the next platform, enter the first glowing rift, and grab the shrine amid three aggressive mobs. They're quick to respawn, so snatch the card, test an elite chest if curious, and bail before round two.
3. The High Priestess
Your first basic tower encounter. From the Church of the Absolute, trek south to the Tower of the High Priestess. Use The Fool to enter, battle up through standard mob waves, and topple the summit boss for the card. Elite chests line the ascent—perfect for a gear check.
4. The Empress
Skip the spider-infested dens by cheesing the cliffs. Teleport to the Church of the Last Days, veer south, and scale rocks to drop into Esagila at the waterfall base. The shrine gleams right there, steps from Utu's spawn circle—this world boss cycles every six minutes and drops the potent Contagious Plague bow. Farm a few rounds post-card for that artifact edge.
5. The Emperor
An elite twist on the tower formula. Fast travel to the Church of the Meek and push north to the Tower of the Emperor Elite Stronghold. Groups swarm here for the chest density, so sync with one at the door. The Fool unlocks entry; expect tougher mobs and a beefed-up boss. Scour corners post-fight for hidden elite chests—solo sneaking is possible but risky.
6. The Hierophant
Basic tower vibes again. From the Church of the Last Days, you're practically at the doorstep of the Tower of the Hierophant. Climb, clear, claim—standard fare, with loots to pad your inventory.
7. The Lovers
MSQ often delivers this one in Castle Draug's throne room. Teleport to the Church of the Twelve, dash south through the halls (you'll revisit here questing), and interact with the central shrine. No fuss, just royal ambiance.
8. The Chariot
A gimme if you've toured outposts. Beam into the Grand Carnival Outpost fast travel— the shrine sits prominently in the upper plaza, amid festive ruins. Snap it up en route to bigger hunts.
9. Strength
This puzzle-oriented tower stands out. From the Church of the Absolute, jog east to the Tower of Strength. Grab orbs from alcoves, haul them upstairs while sidestepping spike pits, and slot them to unbar doors. Skip the third orb via a wall-climb glitch to avoid drops; bypass the final gate by circling around. Elite chests abound at the summit—shoutout to community clears that make these less solitary.
10. The Hermit
RNG rears its head in the Catacombs mode. Random rooms generate the shrine, often post-sixth boss or via a hidden torch lever. The mode launched a tad glitchy, so farm when patched—expect 15-20 runs for luck. Patience pays off for this elusive one.
11. Wheel of Fortune
Breezy climb ahead. Teleport to the Church of Perseverance, head north to the Buru of Urkala ruins, and ascend the weathered stairs. The shrine crowns the structure, guarded by a luminous figure—quick grab, no drama.
12. Justice
Back to basics. From the Church of Divinity, veer west to the Tower of Justice. Fool-card entry, mob clears, boss smackdown—your blueprint for tower success.
13. The Hanged Man
Climbing prowess tested. Fast travel to the Church of the Cup, then northeast to a rocky ledge. Dismount and scramble up (mounts slip here), following broken stone bridges to descending steps where the shrine awaits. Elite zone access adds a gated twist—group if needed for safety.
14. Death
MSQ memory lane in Castle Jakul. If quest-skipping, infiltrate the king's reminiscence chamber via the main halls. The shrine materializes during the spectral sequence—haunting but harmless.
15. Temperance
Swift detour south of the Church of the Living Saint to Monastery Isle. Cross the bridge, slip into the fort, hang a left, and weave past mobs to the rear wall. The shrine hugs the stone—behind a deceptive white barrier, so circle if blinded.
16. The Devil
Standard tower fare. Teleport to the Church of the Sword, head west to the Tower of the Devil. Ascend, conquer, collect—the devil's in the details, but not too devilish.
17. The Tower
Illusion plays tricks here. Trek northwest from the Church of Eternal Day (or Hinterland) to a misty lake isle. Quaff a Potion of Fool's Sight (crafted at Arcana stations with dirt or Anima) to unveil the shrine on the patch of land. Solo viable, but potion timing is key.
18. The Star
Tower time once more. From the Church of Revelation, push west to the Tower of the Star. If visibility falters, a Fool's Sight potion might help—otherwise, it's a clear climb to glory.
19. The Moon
Eastern jaunt from the Church of the Frontier leads to the Tower of the Moon. Basic ascent, lunar-themed boss—grab the card and gaze at your growing set.
20. The Sun
Day or night, this shines in the Tower of the Hermit. Teleport to the Church of Last Prayer, east to the tower, and dispatch the Memory of Yonas boss to reveal the shrine. No potion needed, but confirm post-fight—it's not always at first glance.
21. Judgement
Perched high in Ashfall Watch, south of the Church of Contemplation. A jump puzzle guards it behind the tallest spire: Trial ledges, hug walls, and persist upward. Reverse the path downhill if stuck—visual cues abound.
22. The World
MSQ wolf stand in Sarthorn Moot, south of the Church of Divinity. Underground path over surface climb leads quickest to the shrine—dive in, emerge complete.
23. Echo
Endgame wall: Deep in the Isle of the Night raid. Complete the full instance (tough solo, scales with gear), and the shrine echoes at the finale. Farmable as raids ease, but bring a squad for sanity.
24. Rebirth
Siege-locked in Arcanist's Hold, west of the Church of Fates. Join or start the elite stronghold event (7-10 players ideal, 7-minute clear). Slip in post-clear for the shrine and chests before shutdown—15-minute cooldown, so time your entry. Evac fast or face the wipe.
FAQs on New World Aeternum Tarot Cards
Q1: How many Tarot Arcana cards are there in Nighthaven?
A: There are 24 in total—22 drawing from major arcana traditions, plus two unique Aeternum additions (Echo and Rebirth) for that extra flavor.
Q2: Do I need all cards to open elite chests?
A: Nope! Each chest requires a specific card combo, but collecting more expands your access. Once unlocked per character, they're infinite-use.
Q3: What's the Potion of Fool's Sight for?
A: It reveals hidden shrines like The Tower and potentially The Star—craft at Arcana stations or grab from traders.
Q4: Can I get these cards solo?
A: Most yes, but elite towers, raids, and sieges shine with groups. Use recruitment chat for quick allies.
Q5: Where do I track my card progress?
A: Journal > Documents > Tales of Nighthaven > The Arcana Cards. It shows numbered slots and overall count.
Thanks for Reading
Keep an eye on MMOJUGG for the latest Aeternum drops and strategies.
 Buy New World Aeternum Gold
 New World Aeternum Items
 New World Aeternum Powerleveling