Dune Awakening Trials 6, 7, 8: Locations & Puzzles
Last updated on June 10, 2025 by MMOJUGG Team | Game: Dune Awakening Guide | Tags: Dune Awakening Trials
Welcome, brave adventurers, to the unforgiving sands of Dune Awakening, the thrilling MMO survival game that dropped into Head Start on June 5, 2025! If you're navigating the treacherous trials of the Haga Basin, you've landed in the right place. This guide dives deep into Trials 6, 7, and the intricate "Final Test" (Trial 8), complete with locations, puzzle solutions, and a game-changing storage tip to streamline your journey. For more epic tips and gear to enhance your survival, consider bookmarking our site and exploring our Dune Awakening Solari and Spice store for exclusive goodies to aid your quest!
Invaluable Storage Tip for Efficient Unloading
Before we trek into the trials, here's a golden nugget to save you time: when unloading your buggy or ornithopter at base, head to a chest, click the top-left “Backpack" option, then select your vehicle. Hover over items and press “E" to transfer them instantly into the chest. This trick is a lifesaver for quickly stashing materials after a dune buggy farming run, letting you focus on the adventure ahead!
Trial 6: Devil's Eye Cavern
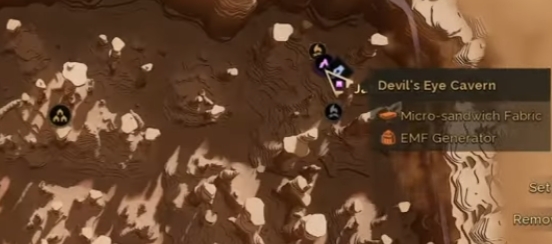
Your journey continues with Trial 6, located at the very top right of the map near the Devil's Eye Cavern, close to a contract marker. Look for camp lights signaling the cave entrance. Equip a knife or sword to cut through the sealed entry. Inside, the tunnels can be disorienting—stick to the left wall to navigate to the altar room. You'll find it destroyed, but interact with the record to complete Trial 6. Easy, right? If you've got an ornithopter, flying here is a breeze, though a bike or foot travel works too.
Trial 7: The Rift Challenge
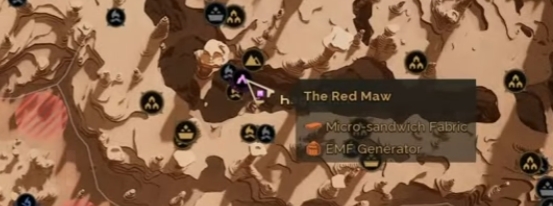
Next up, Trial 7 lies deep in the rift, marked by red lights guiding you to the cave. Descend to the chasm's base floor, spot the nearby camp, and enter the cavern. Cut through the sealed area, take a left, then a right to reach the altar. Here, sniff the spice to enter a hallucination, introducing the Fremen tent mechanic. As a storm rages, sprint to the first tent and interact with it. After a cutscene, the storm returns, and the floor collapses—don't panic! Climb the wall (a key mechanic to remember), cross the gap, and scale the pillar to reach the second tent in time.
Continue with parkour jumps and more climbing as another storm hits. Race to the third tent atop the platform, jump off, and interact to wrap up. One final climb and jump across platforms seals Trial 7. Speed is critical—failing to reach tents in time resets you, so stay sharp!
Trial 8: The Final Test
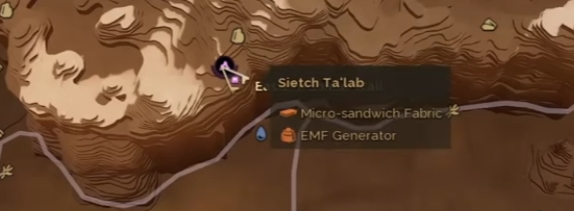
The eighth trial, dubbed the “Final Test," awaits at an intersection up north—zoom in on your map to pinpoint it. Fly in with an ornithopter if possible, but beware: a sandstorm might hit, so don't leave your vehicle exposed. Enter the cave, follow the path to the temple, and watch for enemies (no combat required yet).
The Door Puzzle
A questionnaire door blocks your way, stumping many players. Solve it with the sequence: 2-2-1-3-1-3 (or label them as top middle “1," bottom “2," and side “3"). Trial and error works, but a wrong answer resets the puzzle. Once correct, the door opens—note that only one player can attempt this at a time, so you might wait if others are ahead.
Navigating the Temple
Inside, a companion guides you briefly. Ignore side rooms for now (though they hold loot) and take the right passageway. Use your cutter ray to clear boulders—hope you brought it! The path twists, so choose the right section, go left, then straight, and climb the steps to the puzzle room.
The Three Lessons Puzzle
Here, three lessons test your wits:
Lesson 1: Bind, Dunes, Grass
Lesson 2: Planting, Shelter, Downwind
Lesson 3: Borrowing, Animals, Sand
Listen to your companion's hints if you'd rather solve it solo. Complete all three, and the door unlocks. Continue through passageways, grabbing loot from side rooms if you wish, until you reach the grand hall.
The Ring Puzzle
A floor mechanism with three rings—inner, middle, and outer—guards the next step. Here's a simple fix:
Rotate the middle ring to align its channel with the base.
Adjust the inner ring to match the middle channel.
Spin the outer ring until everything lines up.
Alternatively, some players rotate the inner ring twice, the middle ring once, and the outer ring twice. Once aligned, interact with the altar, cut yourself, and let blood flow to unlock the door.
Final Steps and Combat
Listen to your companion, then try opening a safe by the chest—she'll promise to crack it later. Exit, but brace for intruders! They're manageable—one shot from a sniper can drop them, though a sword helps if you're swarmed. Loot their bodies for valuable items, then head up and press “E" to exit. Congrats—you've completed all eight trials in the Haga Basin main story questline! Return to base, where Ari reveals she's found the decoding minimic film, directing you to Harko Village next.
FAQ: Your Dune Awakening Trials Questions Answered
Where are Trials 6, 7, and 8 located in Dune Awakening?
Trial 6 is at Devil's Eye Cavern (top right of the map), Trial 7 is in the rift near red lights, and Trial 8 is at a northern intersection—check your map!
How do I solve the door puzzle in Trial 8?
Use the sequence 2-2-1-3-1-3, where 1 is top middle, 2 is bottom, and 3 is side. Wrong answers reset the puzzle, so be precise.
What are the three lessons in Trial 8's puzzle room?
The combinations are: (1) Bind, Dunes, Grass; (2) Planting, Shelter, Downwind; (3) Borrowing, Animals, Sand.
How do I survive the storms in Trial 7?
Climb walls and pillars quickly to reach Fremen tents before time runs out—failing resets you to the start.
What's the best way to unload items in Dune Awakening?
At a chest, select “Backpack," choose your vehicle, and press “E" to transfer items instantly—perfect for farming runs!
Thanks for Reading
You're now armed to tackle Trials 6, 7, and 8 in Dune Awakening with confidence, from navigating caves to cracking puzzles and mastering storage. Stay tuned to MMOJUGG for more survival tips and tricks to thrive in the harsh deserts of this epic MMO!
👉 [Explore our Dune: Awakening Ultimate Guides Hub Now]
Table of Content
 Buy Dune Awakening Solari
 Buy Dune Awakening Items
 Dune Awakening Boosting