Dune Awakening Deep Desert Map This Week (July 9–16, 2025)
Last updated on July 23, 2025 by MMOJUGG Team | Game: Dune Awakening Guide | Tags: Deep Desert Map
1. Deep Desert Map Coriolis Cycle Overview
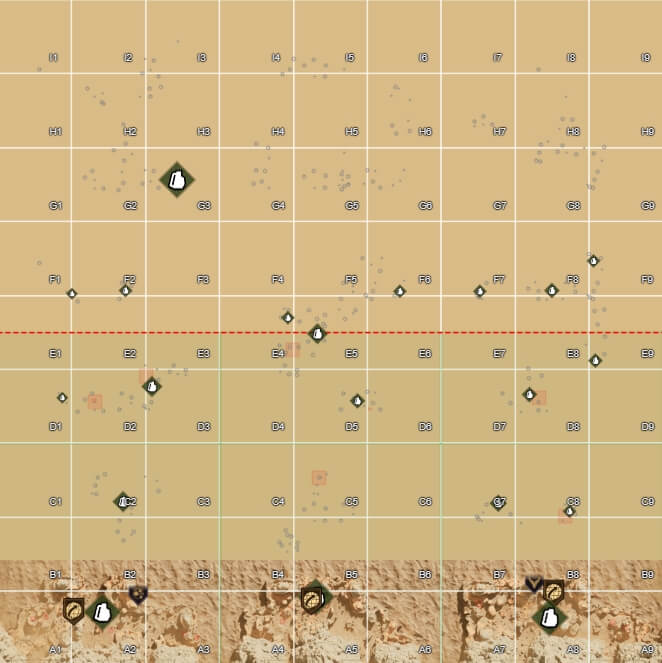
The Deep Desert Map in Dune: Awakening serves as the game's rotating endgame zone, unlocked through the Coriolis cycle. Every week, its terrain, resource layout, and schematic drop sites are reconfigured—forcing players to adapt in real time. With 81 tiles spread across a 9x9 grid, and regions split between PvE and full PvP zones, navigating the desert is never static.
- The Deep Desert Map spans 81 tiles (A1–I9), split into PvE (rows A–E) and PvP zones (rows F–I).
From July 23 to July 30, 2025, the Deep Desert enters a new Coriolis cycle with moderate resource dispersion. Key structures like Imperial Testing Stations and Shipwrecks remain active across PvE and PvP zones, offering schematic and module drops that shape weekly progression. With spawn logic shifting again, tactical routing and timing will be critical for solo recovery and guild control alike.
Whether you're farming for Mk6 modules, competing over Landsraad control points, or building a solo survival loop, understanding this week's Deep Desert Map is essential to staying ahead.
For more Dune Awakening Content👉 [Explore our Dune: Awakening Ultimate Guides Hub Now]
2. Deep Desert Map This Week - Item Loot Pool (July 23–30, 2025)
This week's Deep Desert Map cycle introduces a curated pool of Unique schematics and Mk6 modules, distributed across PvE and PvP structures. The item type depends on origin structure—Imperial Testing Stations, Caves, and Shipwrecks each yield distinct component sets.
Deep Desert Loot Pool July 23–30, 2025
Mk6 Modules
Albatross Wing Module Mk6 | Bigger Buggy Boot Mk6 | Buoyant Reaper Mk6 | Filter Extractor Mk6 | Mohandis Sandbike Engine Mk6 | Steady Carrier Boost Module Mk6
Combat & Gear Uniques
Circuit Gauntlets | Static Needle | Villari's Stillsuit Boots | Villari's Stillsuit Gloves | Omni Focused Dew Scythe | The Emperor's Wings Mk6
Deep Desert Loot Pool July 16–23, 2025
Mk6 Modules
Combat & Gear Uniques
Desert Garb | Executor's Helmet | Executor's Chestpiece | Executor's Gauntlets | Regis Tripleshot Repeating Rifle
Executor's Pants | Executor's Boots | Hook-claw Gloves | Indara's Lullaby | Shellburster | Idaho's Charge
Deep Desert Loot Pool July 9–16, 2025
Mk6 Modules
Combat & Gear Uniques
Bashar's Command | Salusan Vengeance | Vaporizer | Power Harness
Ix-core Leggings | Pincushion Helmet | Pincushion Gauntlets | Pincushion Pants | Pincushion Boots
Drop Mechanics
PvP Testing Stations:up to 6 schematics per container
PvE Structures:1–2 schematics per container
Shipwrecks:mixed pools with vehicle modules & universal schematics
Caves:fiber & chemical inputs only
Loot containers use randomized respawn timers
Component origin split by structure type
Fallen Shipwreck Locations
Locations:B2 | C2–C3 | D2–D4 E3–E5 | F3 | F5 | F8–F9 G3–G4 | G8 H1–H3 | H6–H7 I1 | I5
Drop Pool: These have a shared loot pool with consistent drop rates (~47%) for: Buoyant Reaper Mk6 | Filter Extractor Mk6 | Steady Carrier Boost Module Mk6 | Mohandis Sandbike Engine Mk6 They're ideal for solo schematic loops and low-risk farming.
Recovery Notes This week's wrecks form a dense central–eastern sweep, ideal for chaining schematic recovery with PvP-aware routing.
C2–E5 cluster favors solo loops with low patrol density and stable schematic crates
H-row tiles (H1–H3, H6–H7) sit near Testing Stations and spice corridors — high-value but contested
Recommended route: C3 → E4 → F9 → H2 → I5, with stealth gear and worm suppression modules for off-peak extraction.

Large Shipwreck Locations
Locations:A1–A5 | A7 | A9 H2 | H8 | I5
Drop Pool: Albatross Wing Module Mk6 | Bigger Buggy Boot Mk6 | Buoyant Reaper Mk6 Circuit Gauntlets | Filter Extractor Mk6 | Mohandis Sandbike Engine Mk6 Omni Focused Dew Scythe | Static Needle | Steady Carrier Boost Module Mk6 The Emperor's Wings Mk6 | Villari's Stillsuit Boots | Villari's Stillsuit Gloves
Recovery Notes This week's large wrecks are concentrated in the A-row and H/I sectors, forming a high-yield loop for Mk6 schematics and elite gear.
A1–A5, A7, A9: PvE-friendly recovery path with low patrol density and stable schematic crates
H2, H8, I5: Confirmed elite wrecks with elevated PvP risk and premium drop tables — including The Emperor's Wings Mk6 and Villari gear
Recommended route: A3 → A5 → H2 → H8 → I5, timed for off-peak cooldown windows and supported by stealth or worm suppression modules.

Forgotten Caves Location
Locations:A1–A3 | A5–A8 G5
Drop Pool:
Crafting Inputs:Fiber components | Chemical reagents
Recovery Notes This week's caves form a compact northern loop ideal for solo fiber runs, chemical farming, and stealth-based schematic recovery.
A-row caves sit outside major patrol zones, offering low-risk access for solo players
G5 is adjacent to PvP wreck clusters — moderate risk, but high resource density
Recommended route: A2 → A5 → A7 → G5, timed for cooldown windows and supported by worm suppression gear.

Imperial Testing Stations
Locations:A2–A5 | A8 D2 | F8 | H2
Recovery Notes This week's stations form a tight central–eastern loop, ideal for chaining schematic crates and Mk6 module farming.
A2–A5, A8: PvE-friendly with stable drop rates and low patrol density
D2, F8, H2: Confirmed elite stations with unique loot tables — including Static Needle, Omni Focused Dew Scythe, and Villari gear
Recommended route: A3 → D2 → F8 → H2, timed for cooldown windows and supported by stealth or worm suppression modules.

3. Deep Desert Map This Week – Resource Nodes (July 23–30, 2025)
This week's patch introduces randomized respawn timers and new PvE material drops, reshaping resource route planning across the desert. High-tier materials now appear deeper within PvP zones, while A–C row tiles offer safer solo loops for Plastanium fibers, chemical inputs, and foundational metallurgy. Rotation density has shifted toward central testing corridors and spice fields, requiring tighter faction coordination and off-peak farming windows.
Each module below covers active resource tiles and strategic notes for July 23–30, ordered by gameplay priority and verified tier rarity.
3.1 Large Spice Fields
Locations:F1 | G5 | H1 | H8 | I3
Resource Type:High-yield Spice Sand nodes

Ideal for stealth harvesting spice sand during off-peak hours (You may need a sandcrawler).
Harvest Notes This week's spice fields form a vertical corridor from F1 to I3, ideal for chaining high-yield runs with minimal lateral travel.
F1–G5: PvE-friendly zone with low patrol density and stable spice plumes
H1–H8: Moderate PvP exposure near wreck clusters and control nodes
I3: Eastern anchor point with frequent plume eruptions and high melange density
Recommended route: G5 → H1 → I3, timed for early plume spawns and supported by Assault Ornithopter storage.
3.2 Medium Spice Fields
Locations: F2–F4 | F6–F9 | G-row | H-row | I-row
Resource Type:Mid-yield Spice Sand nodes

Harvest Notes This week's medium fields form a broad vertical band from F2 to I9, ideal for chaining refinery runs and plume scouting.
F-row tiles offer consistent plume density with moderate PvP exposure
G–I rows sit near control nodes and wreck clusters — high yield but contested
Fields are best approached with Static Compactor and worm suppression gear
Recommended sweep: F3 → G4 → H6 → I3, timed for early plume eruptions and supported by Assault Ornithopter storage.
3.3 Small Spice Fields
Locations: D1–D9 | E1–E9 | F1–F5 | F7-F9 | G1–G9 | H1–H9 | I1–I9
Resource Type: Low-to-mid yield Spice Sand nodes

Harvest Notes This week's small fields are scattered across the southern half of the map, forming a wide vertical band ideal for stealth farming and plume scouting.
D–F rows offer low-risk solo access with minimal patrol interference
G–I rows sit near PvP wreck clusters and control nodes — moderate risk, but high spice density
Best approached with Static Compactor and worm suppression gear during early plume windows
3.4 Titanium Ore Nodes
Large Node: Mid of E5/E6
Resource Type: Raw Titanium Ore

Titanium deposits this cycle are concentrated around rocky outcrops in mid-to-high conflict zones. Middle of E5/E6 hosts a large node near schematic recovery paths and PvP patrol loops — ideal for guild-supported extraction. B-row to I-row offer small-yield deposits with moderate risk; both sit near spice corridors and faction movement routes. Recommended tools: Cutteray Mk5 or higher for optimal yield.
3.5 Stravidium Mass Nodes
Large Nodes: G8
Resource Type: Raw Stravidium Mass

These nodes are embedded in rocky outcrops across high-conflict sectors. G8 sit near spice corridors and PvP gear zones — expect frequent faction patrols and interception risk. Cutteray Mk5 or higher is required for mining; refining into Stravidium Fiber demands chemical processing and water input.
3.6 Erythrite Crystal Nodes
Location: B4 | G5
Resource Type: Raw Erythrite Crystal

B4 H5 hosts a small Erythrite deposit near schematic recovery paths and PvP patrol loops this week. The node appears as a glowing pink crystalline outcrop, often embedded in rocky terrain or cave walls. Extraction requires a Cutteray Mk2 or higher — Mk3+ recommended for optimal yield. Due to its proximity to faction movement zones, solo mining is viable only during off-peak hours or with stealth gear. Refines into Cobalt Paste via Chemical Refinery (3x Erythrite Crystal + 75mL water per unit).
3.7 Iron Ore Nodes
Location: G6
Resource Type: Raw Iron Ore

G6 hosts a Large Iron Ore Node deposit embedded in rocky terrain near PvP rotation paths. The node appears as a dark silver-veined granite outcrop, typically mined with a Cutteray Mk2 or higher for optimal yield. Due to its proximity to contested sectors and faction patrol loops, solo extraction is viable only during off-peak hours or with stealth gear. Iron Ore refines into Iron Ingots (5x ore + 25mL water per unit) via Small Ore Refinery.
3.8 Carbon Ore Nodes
Medium Node: F1
Resource Type: Raw Carbon Ore

F1 hosts a medium Carbon ore node deposit embedded in rocky terrain near PvP patrol paths and schematic recovery loops. The node appears as a dark matte outcrop with white streaks, typically mined with a Cutteray Mk2 or higher. Carbon Ore is a key input for crafting Steel Ingots (4x Carbon + 1x Iron Ingot + 50mL water), making this tile essential for mid-game alloy production. Due to its proximity to contested sectors, solo extraction is viable only during off-peak hours or with stealth gear.
3.9 Aluminium Ore Nodes
Large Nodes: E5 | E9 | A2 | A8 | D2
Resource Type: Raw Aluminium Ore

These nodes are embedded in rocky terrain across mid-risk sectors, E5 D2 offering stable access near schematic recovery paths and PvE corridors. A2 and A8 sit within solo-accessible loops, ideal for chaining with Testing Stations and spice fields. Extraction requires a Cutteray Mk2 or higher; refining into Aluminium Ingots demands 4x ore + 50mL water via Ore Refinery. Due to their proximity to faction patrol paths, off-peak harvesting is recommended for solo runners.
3.10 Copper Ore Nodes
Large Nodes: H3 | A2 A5 A8
Resource Type: Raw Copper Ore

These copper ore nodes are embedded in rocky terrain near PvE corridors and schematic recovery paths. A2 offers solo-accessible harvesting loops with minimal risk, ideal for chaining with Testing Stations and Aluminium deposits. H3 sits in PvP patrol paths and faction movement zones — recommended for guild-supported extraction or stealth runs during off-peak hours. Copper Ore refines into Copper Ingots (4x ore + 50mL water) via Small Ore Refinery and is essential for early-game electronics and alloy crafting.
3.11 Basalt Stone Nodes
Large Nodes: A2 | A8 | G3
Resource Type: Raw Basalt Stone
These basalt stone nodes are embedded in rocky terrain along PvE-accessible corridors, ideal for solo harvesting loops and schematic chaining. A2 sits near Testing Stations and Copper deposits, making it a versatile tile for early-game material runs. A8 offers stable access with no PvP interference, often used for crafting routes that require high-density stone inputs. Basalt refines into Basalt Blocks (3x ore + 50mL water) via Small Ore Refinery and is essential for structural components and advanced construction modules.
4. Deep Desert Map This Week – Strategic Routes & Playstyles (July 23–30, 2025)
4.1 Solo Player Tactics
Low-Risk Schematic Loop A2 → A5 → E3 → F3 → G4 Focus: Imperial Testing Stations and Fallen Shipwrecks with stable schematic crates Notes: Minimal PvP exposure; ideal for compactor farming and off-peak solo runs
Fiber & Chemical Sweep A1 → A3 → A6 → G5 Focus: Forgotten Caves for crafting inputs Notes: Safe access across A-row; G5 offers moderate risk but high resource density
Spice Corridor Harvest F1 → G5 → H1 → I3 Focus: Large Spice Fields with high melange yield Notes: Use Static Compactor and worm suppression gear; avoid peak skirmish windows
Shared Pool Farming B2 → D2 → E5 → F5 → G8 Focus: Small Fallen Shipwrecks with ~47% drop rate for Mk6 modules Notes: Efficient for solo schematic recovery and low-risk farming
4.2 Guild-Controlled Zones
Elite Loot Chain D2 → F9 → H2 → H8 → I5 Focus: Large Shipwrecks and Testing Stations with guaranteed drops (Static Needle, Omni Focused Dew Scythe, Villari gear) Notes: High PvP exposure; ideal for squad runs with stealth gear and worm suppression
Control Node Grid C5 → E6 → G3 → H2 → H5 Focus: Relay beacon deployment and schematic anchoring Notes: Supports cooldown patrols and PvP intercepts; anchors spice corridor control
Spice Field Domination F1 → G5 → H8 → I3 Focus: Large and Medium Spice Fields for sustained melange farming Notes: Requires layered entry paths and coordinated plume timing
PvP Intercept Network G2–G6 → H2–H5 → H8 Focus: High-traffic wreck zones and control tiles Notes: Ideal for guild FOBs, skirmish rotations, and schematic denial ops
5. Deep Desert Map This Week – Landsraad Control Nodes & Faction Strategy
The Landsraad system transforms Dune: Awakening's endgame into a server-wide political contest, where guilds aligned with Great Houses compete for control, decree power, and exclusive rewards.
5.1 Verified Control Node Locations (July 23–30 Cycle)
These control points are active from July 23 to July 30, verified through MMOJUGG's annotated map and in-game scouting. Most are positioned near high-value tiles, making them critical for both PvP scoring and schematic farming.
Location: B8 | C5 D2–D3 | D8 E5–E6 | E9 F1 G2–G6 | G8 H2–H5 | H8
Control Notes This week's control nodes form a dense central–eastern lattice, ideal for schematic anchoring, spice corridor control, and cooldown patrols.
D–F rows offer layered access to Testing Stations, caves, and PvE wrecks — optimal for solo recovery loops
G–H sectors sit near elite wrecks and spice fields — expect moderate PvP exposure
C5, E9, H8 serve as strategic anchors for relay beacons and intercept routes

5.2 Control Point Mechanics
Capture Logic: Standing inside a control node earns 10 points per minute for your faction. No combat is required to claim, but PvP risk is high.
Node Tasks: Each control point is tied to a Great House. Tasks vary weekly — from resource delivery to PvP defense.
Contribution Tracking: Personal and guild contributions are logged separately. Rewards scale with effort, not just victory.
5.3 Faction Influence & Voting Power
Task Completion: Guilds earn votes by completing house-specific objectives.
Siselrad Bonus: Completing five tasks in a line (horizontal, vertical, diagonal) grants early decree access.
Top Guilds Vote: Only the top 5 contributing guilds in the winning faction vote on the next week's decree.
Decree Effects: Server-wide buffs include PvP looting rules, crafting cost reductions, vendor unlocks, and XP boosts.
5.4 Strategic Recommendations (July 23–30, 2025)
Elite Loot Chain Route: D2 → F9 → H2 → H8 → I5 Focus: Large Shipwrecks and Imperial Testing Stations with guaranteed drops (Static Needle, Omni Focused Dew Scythe, The Emperor's Wings Mk6, Villari gear) Notes: High PvP exposure; ideal for squad runs with stealth gear and worm suppression
Solo Schematic Loop Route: A2 → A5 → E4 → F3 → G4 Focus: PvE-friendly Testing Stations and Fallen Shipwrecks with stable schematic crates Notes: Low patrol density; optimal for off-peak farming and compactor runs
Spice Corridor Sweep Route: F1 → G5 → H1 → H8 → I3 Focus: Large Spice Fields with high melange yield Notes: Use Assault Ornithopter for plume chaining; moderate PvP risk near control nodes
Control Node Intercept Grid Anchors: C5 | E6 | G3 | H2 | H5 Focus: Relay beacon deployment and schematic anchoring Notes: Ideal for guild FOBs and cooldown patrols; supports both PvP and PvE rotations
Shared Pool Farming Target: Small Fallen Shipwrecks (B2–F9) Loot: Buoyant Reaper Mk6 | Filter Extractor Mk6 | Steady Carrier Boost Module Mk6 | Mohandis Sandbike Engine Mk6 Notes: ~47% drop rate; efficient for compactor farming and low-risk schematic recovery
6. Deep Desert Map This Week – Environmental Hazards
The Deep Desert is more than a PvP zone — it's a volatile ecosystem designed to test survival, coordination, and adaptability. Players face lethal threats including sandworms, heatstroke, dehydration, sandstorms, and extraction pressure. With Patch 1.1.15.0, several hazard mechanics were rebalanced to increase strategic complexity:
PvP zone exit delay increased from 5s to 30s, making storm evasion and worm avoidance more difficult near control points
Suspensor belts and shield tech now generate more vibration, increasing sandworm aggro radius
Tier 6 resources now spawn in PvE zones, allowing safer access to high-value materials without worm exposure
6.1 Sandworm Mechanics
Sandworms (Shai-Hulud) are apex predators that react to vibration — from footsteps, vehicles, shields, and tech. They are unkillable and will consume players, vehicles, and gear instantly upon breach.
Vibration Meter Threat Levels: White/Yellow: Safe | Orange: Worm aware | Red: Breach imminent — flee immediately
Survival Tactics
Stick to rocky terrain — worms cannot breach solid ground
Crouch-walk across dunes to reduce vibration output
Disable tech like suspensor belts and compactors
Use Thumpers to lure worms away from harvest zones
Hover with ornithopters — stationary flight does not trigger aggro
6.2 Heat & Dehydration
Arrakis' sun causes rapid heatstroke, gear degradation, and hydration loss — especially during midday peaks.
Survival Strategies
Travel during dawn or dusk to avoid heat spikes
Wear Stillsuits for optimal temperature regulation
Use Dew Reapers and Blood Extractors to replenish hydration
Build outposts near shaded terrain (caves, rock walls)
6.3 Sandstorms & Visibility
Sandstorms obscure vision, scatter squads, and disrupt harvesting and navigation tools.
Tactical Use Cases
Leverage storms for PvP ambush or stealth extraction
Delay harvesting until conditions normalize
Navigate using compass overlays and triangulated relay beacons
Patch Impact
6.4 Resource Scarcity & Extraction Pressure
Environmental threats directly reduce mining efficiency, especially near Tier 5 and Tier 6 nodes.
Efficiency Tips
Compact quickly and extract early to reduce exposure
Equip aggro-reduction softboots with static compactors
Avoid peak worm activity (typically 12:00–14:00 CST)
Route multiple nodes around cooldown windows
7. Deep Desert Map This Week – Solari Farming & Trade Efficiency
Solari is the backbone of economic progression on Arrakis — used for purchasing vehicles, upgrading gear, paying faction taxes, and accessing the CHOAM Exchange. While Patch 1.1.15.0 did not directly alter Solari systems, it introduced environmental and loot changes that indirectly affect farming efficiency. This section outlines the most reliable and scalable methods for earning Solari across PvE, crafting, and market play.
7.1 PvE Chest Farming Routes
Chest loops remain the safest and most consistent method for solo Solari farming. A well-optimized route can yield 45,000–60,000 Solari per 30-minute cycle, with minimal PvP exposure.
Recommended Zones
Khidr's Shadow: Highest chest density, including multiple ultra-tier drops
Sentinel City: Large volume of basic and rare chests — arrive with free inventory space
Sirr'asraar Vault: Reliable ultra chest with no PvP interference
Stonestep Village: Quick stop with high ROI
Beast Claw & Wreck of Alecto: PvP zones with ultra chests — high risk, high reward
Efficiency Tips
Use Mk5 Ornithopter with storage mod for fast transitions
Strip down gear before runs to maximize loot capacity
Auto-equip items mid-run to save inventory space
Repair high-value drops before selling — boosts resale by up to 80%
7.2 Crafting for Profit
Crafting high-demand items offers passive Solari income, especially when paired with efficient base placement and resource routing.
Top Items to Craft
Lubricants: ~50 Solari per batch; scalable with multiple refineries
Mercenary Stillsuit Boots: ~7,800 Solari per unit; excellent return-to-cost ratio
Radiation Suits: 10,000–17,000 Solari each; requires Sandtrout Leather and refined DurAluminum
Production Tips
Queue long crafts (e.g., silicone blocks, suits) before logging off
Use multiple refineries and stills to reduce downtime
Farm flour sand, aluminum, and water in parallel to streamline inputs
Prioritize durability when selling — vendor payouts scale with item condition
7.3 CHOAM Exchange Optimization
The Exchange is a player-driven auction house where rare items fetch premium prices. Success depends on timing, market awareness, and listing strategy.
High-Value Listings
Spice Melange: 19,000–25,000 Solari
Plastanium Ingots: ~8,000 Solari
Lasguns & Unique Schematics: Up to 190,000 Solari
Trade Tips
Undercut competitors by 5–10% for faster sales
Use 3-day listings for visibility; avoid flooding the market
Monitor server trends — some items spike weekly (e.g., Baron's Bloodpack)
Avoid selling rare materials to NPCs — Exchange yields 3–5x more
7.4 Landsraad Tasks & PvP Looting
Deep Desert tasks offer strong Solari payouts and rare schematics, especially for mid-to-late game players.
Quest Rewards
Kill quests: 7,000–10,000 Solari + crate loot
Rare drops: Improved Holzman Actuators (~10,500 Solari), Eiderhost Charge, Caret Viper schematics
Risk Management
Travel with guildmates or stealth builds
Use relay beacons for fast extraction
Bank Solari after each run to avoid PvP losses
8. Deep Desert Map FAQs July 23–30, 2025
Where are the best solo schematic farming locations on the Deep Desert map this week?
A2–A5, E4, and F3 offer low-risk recovery loops near Imperial Testing Stations and Fallen Shipwrecks. Ideal for Static Compactor runs during off-peak windows.
Which Deep Desert tiles drop The Emperor's Wings Mk6 this week?
Confirmed drop at H8 (Large Shipwreck). Route recommendation: D2 → F9 → H2 → H8 for chaining high-value schematics.
What are the safest spice harvesting zones on the Deep Desert map?
F1, G5, and H1 host Large Spice Fields with low patrol density. For Medium Fields, F2–F4 and F6–F9 offer plume consistency for solo runs.
How do I identify high-density Mk6 schematic zones?
Imperial Testing Stations at D2, F8, and H2 guarantee unique Mk6 module drops. Pair with nearby Fallen Shipwrecks for shared pool optimization.
Are Villari's Stillsuit pieces available this week in Deep Desert?
Yes. Gloves drop from D2, Boots from I5. Both are tied to Imperial Testing Station and Large Shipwreck loot tables, with ~80% confirmed rates.
Thanks for Reading
That wraps up this week's comprehensive guide to surviving and thriving on Arrakis. We've covered everything from deep desert solo routes to faction warfare, environmental hazards, and Solari optimization — all tailored to the current cycle and fully grounded in verified mechanics.
If you enjoyed this breakdown and found it useful for your journey through Dune: Awakening, we welcome you to join us again next week. The sands shift, control zones rotate, and new strategies emerge with each patch — and we'll be here to chart it all out.
See you next cycle. Stay sharp, stay mobile, and never overlook a schematic. 👉 [Explore our Dune: Awakening Ultimate Guides Hub Now]
 Buy Dune Awakening Solari
 Buy Dune Awakening Items
 Dune Awakening Boosting